屏幕空间 UV
获取屏幕空间 UV
- 方法一:使用
VPOS 语义获取屏幕空间 uv:[[1 ShaderLab#VPOS 屏幕空间像素位置]]
- 方法二:顶点着色器计算的顶点齐次裁剪坐标 xy 分量就是屏幕空间的物理像素大小,利用它除以屏幕分辨率
_ScreenParams.xy 即可。
_ScreenParams:x 是摄像机目标纹理的宽度(以像素为单位),y 是摄像机目标纹理的高度(以像素为单位),z 是 1.0 + 1.0/x,w 为 1.0 + 1.0/y。1
| float2 ScreenUV = (input.positionCS.xy/_ScreenParams.xy);
|
- 方法三:手动计算(麻烦)
1
2
3
4
5
6
7
8
9
10
11
12
|
o.ScreenUV.xy = o.positionCS.xy*0.5 + 0.5* float2(o.positionCS.w,o.positionCS.w);
o.ScreenUV.zw = o.positionCS.zw;
i.ScreenUV.xy *= rcp(i.ScreenUV.w);
#ifdef UNITY_UV_STARTS_AT_TOP
i.ScreenUV.y = 1 - i.ScreenUV.y;
#endif
|
_ScreenParams.xy 获取屏幕 UV 会受到 RenderScale 影响,有没有办法不受影响?
- **方法四:用像素位置除以渲染目标分辨率
_ScaledScreenParams**。_ScaledScreenParams.xy 属性会考虑渲染目标的任何缩放,例如动态分辨率。分量含义和 _ScreenParams 一样1
| float2 ScreenUV = i.positionCS.xy / _ScaledScreenParams.xy;
|
1
| float2 ScreenUV = GetNormalizedScreenSpaceUV(i.positionCS);
|
抓屏
ShaderGraph 节点:SceneColor
CameraOpaqueTexture
@ 方法一:URP Asset 开启 Opaque texture,降采样用于调整抓屏的分辨率 OpaqueTexture 只能渲染不透明物体。
![[Pasted image 20230706212015.png|500]]
![[Pasted image 20230706220148.png]]
@ 方法二 :RenderFeature 的 SetupRenderPasses 中设置 ConfigureInput,这样就可以采样到 _CameraOpaqueTexture 纹理了。
1
| m_renderPass.ConfigureInput(ScriptableRenderPassInput.Color);
|
title:使用方法1
2
3
4
5
6
7
|
TEXTURE2D(_CameraOpaqueTexture);
SAMPLER(sampler_CameraOpaqueTexture);
float2 ScreenUV = GetNormalizedScreenSpaceUV(i.positionCS);
float4 ScreenColor = SAMPLE_TEXTURE2D(_CameraOpaqueTexture, sampler_CameraOpaqueTexture, ScreenUV);
|
抓屏不透明
- @ 方法一:使用 RenderFeature 传递 RT。设置 Render Pass 为 Event 为After Rendering Post Processing
1
2
3
4
5
6
| RenderingUtils.ReAllocateIfNeeded(ref m_tempRT0, m_rtDescriptor);
Blitter.BlitCameraTexture(cmd, m_cameraColorRT, m_tempRT0);
m_blitMaterial.SetTexture("_GrabFullScreenTexture", m_tempRT0);
cmd.SetGlobalTexture("_GrabFullScreenTexture", m_tempRT0);
|
- @ 方法二:Overlay 相机抓取 AfterPostProcessTexture
- 在 MainCamera 下新建一个 Overlay 相机并加入主相机堆栈,设置如下:![[Pasted image 20230709102112.png|500]]
- Renderer Data 添加 RenderObjects RF
- Event 设置 AfterRenderingPostProcessing,LigtMode Tags 设置为一个自定义的名称,对应 shader Pass 的 LightMode ![[Pasted image 20230709102214.png]]
- shader 代码主要部分
1
2
3
4
5
6
7
8
9
10
11
12
13
14
15
16
17
18
19
20
21
22
23
24
25
26
27
| SubShader
{
Tags
{
"RenderPipeline" = "UniversalPipeline"
"RenderType"="Transparent"
"Queue"="Transparent"
}
Blend SrcAlpha OneMinusSrcAlpha
ZWrite Off
SAMPLER(_AfterPostProcessTexture);
Pass
{
Tags
{
"LightMode" = "Grab"
}
float4 frag(Varyings input) : SV_Target
{
float2 ScreenUV = (input.positionCS.xy/_ScreenParams.xy);
float4 finalColor = tex2D(_AfterPostProcessTexture,ScreenUV);
}
}
|
fold title:扰动案例1
2
3
4
5
6
7
8
9
10
11
12
13
14
15
16
17
18
19
20
21
22
23
24
25
26
27
28
29
30
31
32
33
34
35
36
37
38
39
40
41
42
43
44
45
46
47
48
49
50
51
52
53
54
55
56
57
58
59
60
61
62
63
64
65
66
67
68
69
70
71
72
73
74
75
76
77
78
79
80
81
82
83
84
85
86
87
88
89
90
91
92
93
94
95
96
| Shader "Custom/SimpleColor"
{
Properties
{
[MainTexture] _NoiseTex ("NoiseTex", 2D) = "white" {}
_MaskTex ("MaskTex", 2D) = "white" {}
_TimeSpeed("HeatTime",range(0,1)) = 0.5
_Force("Force",range(0,0.05)) = 0.05
}
SubShader
{
Tags
{
"RenderPipeline" = "UniversalPipeline"
"RenderType"="Transparent"
"Queue"="Transparent"
}
Blend SrcAlpha OneMinusSrcAlpha
ZWrite Off
HLSLINCLUDE
#include "Packages/com.unity.render-pipelines.universal/ShaderLibrary/Core.hlsl"
CBUFFER_START(UnityPerMaterial)
float4 _NoiseTex_ST;
float4 _MaskTex_ST;
float _TimeSpeed;
float _Force;
CBUFFER_END
SAMPLER(_CameraOpaqueTexture);
SAMPLER(_AfterPostProcessTexture);
TEXTURE2D(_NoiseTex);
SAMPLER(sampler_NoiseTex);
TEXTURE2D(_MaskTex);
SAMPLER(sampler_MaskTex);
struct Attributes
{
float4 positionCS : POSITION;
float2 uv : TEXCOORD0;
};
struct Varyings
{
float4 positionCS : SV_POSITION;
float4 uv : TEXCOORD0;
};
ENDHLSL
Pass
{
Tags
{
"LightMode" = "Grab"
}
HLSLPROGRAM
#pragma vertex vert
#pragma fragment frag
Varyings vert(Attributes input)
{
Varyings output = (Varyings)0;
output.positionCS = TransformObjectToHClip(input.positionCS.xyz);
output.uv.xy =input.uv.xy * _NoiseTex_ST.xy + _NoiseTex_ST.zw;
output.uv.zw =input.uv.xy * _MaskTex_ST.xy + _MaskTex_ST.zw;
return output;
}
float4 frag(Varyings input) : SV_Target
{
float uv1 = input.uv.x + frac(_Time.y * _TimeSpeed);
float uv2 = input.uv.y + frac(_Time.y * _TimeSpeed);
float4 noise1 = SAMPLE_TEXTURE2D(_NoiseTex,sampler_NoiseTex,uv1);
float4 noise2 = SAMPLE_TEXTURE2D(_NoiseTex,sampler_NoiseTex,uv2);
float distortX = ((noise1.r+noise2.r)-1)*_Force;
float distortY = ((noise1.g+noise2.g)-1)*_Force;
float2 ScreenUV = (input.positionCS.xy/_ScreenParams.xy)+float2(distortX,distortY);
float4 finalColor = tex2D(_AfterPostProcessTexture,ScreenUV);
float mask = SAMPLE_TEXTURE2D(_MaskTex,sampler_MaskTex,input.uv.zw).r;
return float4(finalColor.xyz,mask);
}
ENDHLSL
}
}
FallBack "Packages/com.unity.render-pipelines.universal/FallbackError"
}
|
屏幕空间扰动 Screenspace Distortion
法线扰动
世界空间法线扰动:屏幕图像有扭曲和偏移,屏幕图像会随着模型旋转(改变法线朝向)发生变化
![[2023771047.gif|500]]
切线空间法线扰动:屏幕图像只有扭曲,但没有偏移。屏幕图像不会随着模型旋转发生变化。切线空间下的法线是取决与模型本身,与世界位置无关
![[2023771044.gif|500]]
fold1
2
3
4
5
6
7
8
9
10
11
12
13
14
15
16
17
18
19
20
21
22
23
24
25
26
27
28
29
30
31
32
33
34
35
36
37
38
39
40
41
42
43
44
45
46
47
48
49
50
51
52
53
54
55
56
57
58
59
60
61
62
63
64
65
66
67
68
69
70
71
72
73
74
75
76
77
78
79
80
81
82
83
84
85
86
| Shader "Custom/NormalMap"
{
Properties
{
[Normal] _NormalMap("NormalMap", 2D) = "bump" {}
_NormalScale("NormalScale", Range(0, 1000)) = 1
}
CBUFFER_START(UnityPerMaterial)
float _NormalScale;
CBUFFER_END
TEXTURE2D(_NormalMap);
SAMPLER(sampler_NormalMap);
SAMPLER(_CameraOpaqueTexture);
float4 _CameraOpaqueTexture_TexelSize;
...
SubShader
{
Tags
{
"RenderPipeline" = "UniversalPipeline"
"RenderType"="Transparent"
"Queue"="Transparent"
}
Pass
{
Tags
{
"LightMode"="UniversalForward"
}
HLSLPROGRAM
#pragma vertex vert
#pragma fragment frag
#pragma multi_compile_instancing
Varyings vert(Attributes i)
{
Varyings o = (Varyings)0;
o.positionCS = TransformObjectToHClip(i.positionCS.xyz);
o.uv = i.uv.xy * _MainTex_ST.xy + _MainTex_ST.zw;
o.positionWS = TransformObjectToWorld(i.positionCS.xyz);
o.normalWS = TransformObjectToWorldNormal(i.normalOS);
o.tangentWS.xyz = TransformObjectToWorldDir(i.tangentOS.xyz);
o.viewDirWS = normalize(_WorldSpaceCameraPos.xyz - o.positionWS);
return o;
}
float4 frag(Varyings i) : SV_Target
{
float3 normalMap = UnpackNormalScale(
SAMPLE_TEXTURE2D(_NormalMap, sampler_NormalMap, i.uv), _NormalScale);
float3x3 TBN = CreateTangentToWorld(i.normalWS, i.tangentWS.xyz, i.tangentWS.w);
float3 N = TransformTangentToWorld(normalMap, TBN, true);
float3 L = normalize(mainLight.direction);
float3 V = normalize(i.viewDirWS);
float3 H = normalize(L + V);
float NdotL = dot(N, L);
float NdotH = dot(N, H);
float3 diffuse = (0.5 * NdotL + 0.5) * _BaseColor.rgb * mainLight.color;
float3 specular = pow(max(0, NdotH), _SpecularExp) * _SpecularStrength * _SpecularColor.rgb * mainLight.color;
float4 finalColor = MainTex * float4((diffuse + _GlossyEnvironmentColor.rgb) + specular, 1);
float2 bias = N.xy *_CameraOpaqueTexture_TexelSize;
float2 ScreenUV = i.positionCS.xy / _ScreenParams.xy ;
float4 cameraColor = tex2D(_CameraOpaqueTexture,ScreenUV+bias);
return float4(cameraColor.rgb,1);
}
ENDHLSL
}
}
}
|
噪声扰动
获取到屏幕颜色以后,对屏幕 UV 进行偏移达到扭曲的效果,这里用一张 Niose 纹理对屏幕 UV 扭曲。
![[2023762208.gif|450]]
fold1
2
3
4
5
6
7
8
9
10
11
12
13
14
15
16
17
18
19
20
21
22
23
24
25
26
27
28
29
30
31
32
33
34
35
36
37
38
39
40
41
42
43
44
45
46
47
48
49
50
51
52
53
54
55
56
57
58
59
60
61
62
63
64
65
66
67
68
69
70
71
72
73
74
75
76
77
78
79
80
81
82
83
84
85
86
87
88
89
90
91
92
93
94
| Shader "Custom/SimpleColor"
{
Properties
{
[MainTexture] _NoiseTex ("NoiseTex", 2D) = "white" {}
_MaskTex ("MaskTex", 2D) = "white" {}
_TimeSpeed("HeatTime",range(0,1)) = 0.5
_Force("Force",range(0,0.05)) = 0.05
}
SubShader
{
Tags
{
"RenderPipeline" = "UniversalPipeline"
"RenderType"="Transparent"
"Queue"="Transparent"
}
Blend SrcAlpha OneMinusSrcAlpha
HLSLINCLUDE
#include "Packages/com.unity.render-pipelines.universal/ShaderLibrary/Core.hlsl"
CBUFFER_START(UnityPerMaterial)
float4 _NoiseTex_ST;
float4 _MaskTex_ST;
float _TimeSpeed;
float _Force;
CBUFFER_END
SAMPLER(_CameraOpaqueTexture);
TEXTURE2D(_NoiseTex);
SAMPLER(sampler_NoiseTex);
TEXTURE2D(_MaskTex);
SAMPLER(sampler_MaskTex);
struct Attributes
{
float4 positionCS : POSITION;
float2 uv : TEXCOORD0;
};
struct Varyings
{
float4 positionCS : SV_POSITION;
float4 uv : TEXCOORD0;
};
ENDHLSL
Pass
{
Tags
{
"LightMode" = "UniversalForward"
}
HLSLPROGRAM
#pragma vertex vert
#pragma fragment frag
Varyings vert(Attributes input)
{
Varyings output = (Varyings)0;
output.positionCS = TransformObjectToHClip(input.positionCS.xyz);
output.uv.xy =input.uv.xy * _NoiseTex_ST.xy + _NoiseTex_ST.zw;
output.uv.zw =input.uv.xy * _MaskTex_ST.xy + _MaskTex_ST.zw;
return output;
}
float4 frag(Varyings input) : SV_Target
{
float uv1 = input.uv.x + frac(_Time.y * _TimeSpeed);
float uv2 = input.uv.y + frac(_Time.y * _TimeSpeed);
float4 noise1 = SAMPLE_TEXTURE2D(_NoiseTex,sampler_NoiseTex,uv1);
float4 noise2 = SAMPLE_TEXTURE2D(_NoiseTex,sampler_NoiseTex,uv2);
float distortX = ((noise1.r+noise2.r)-1)*_Force;
float distortY = ((noise1.g+noise2.g)-1)*_Force;
float2 ScreenUV = (input.positionCS.xy/_ScreenParams.xy)+float2(distortX,distortY);
float4 finalColor = tex2D(_CameraOpaqueTexture,ScreenUV);
float mask = SAMPLE_TEXTURE2D(_MaskTex,sampler_MaskTex,input.uv.zw).r;
return float4(finalColor.xyz,mask);
}
ENDHLSL
}
}
FallBack "Packages/com.unity.render-pipelines.universal/FallbackError"
}
|
极坐标 UV
极坐标的优点就是模型只需要很低的面数就能够轻易制作出完美的圆形效果,同时极坐标的偏移轴是径向和角度这两个轴向,可以制作出从圆心处收缩或扩散以及旋转的效果,很适合制作魔法阵、Buff 等圆形动态特效。
![[456415651sd.gif|400]]
title:代码实现1
2
3
4
5
6
7
8
9
10
11
12
13
14
15
16
17
18
19
20
21
22
23
24
| float4 frag(Varyings i) : SV_Target
{
i.uv = i.uv - float2(0.5, 0.5);
float theta = atan2(i.uv.y, i.uv.x);
theta = theta / PI * 0.5 + 0.5 + _Theta;
float r = length(i.uv) + _Radius;
i.uv = float2(theta, r);
float4 MainTex = SAMPLE_TEXTURE2D(_MainTex,sampler_MainTex,i.uv);
return float4(MainTex);
}
|
我们常用笛卡尔二维坐标系统,极坐标是一种坐标系统,极坐标是用距离和角度来表示二维坐标中的一个点。相比于 UV 坐标,极坐标则是直接将坐标系改了,由默认 UV 两轴坐标定义的方形笛卡尔直角坐标系,转换成了由弧度、半径两个坐标定义的圆形极坐标系,在这基础上进行动态偏移的效果。
ShaderGraph Polar Coordinates 节点:极坐标官方结点文档
通过 UV 坐标(其实就是笛卡尔二维坐标)转换为极坐标表示。
![[213a69bbdbedbc30c75fb2c008ab54a4_MD5.jpg|500]]
上图就是 Unity 实现的极坐标:R 通道表示距离,G 通道表示角度。
官方代码:
1
2
3
4
5
6
7
| void Unity_PolarCoordinates_float(float2 UV, float2 Center, float RadialScale, float LengthScale, out float2 Out)
{
float2 delta = UV - Center;
float radius = length(delta) * 2 * RadialScale;
float angle = atan2(delta.x, delta.y) * 1.0/6.28 * LengthScale;
Out = float2(radius, angle);
}
|
极坐标:
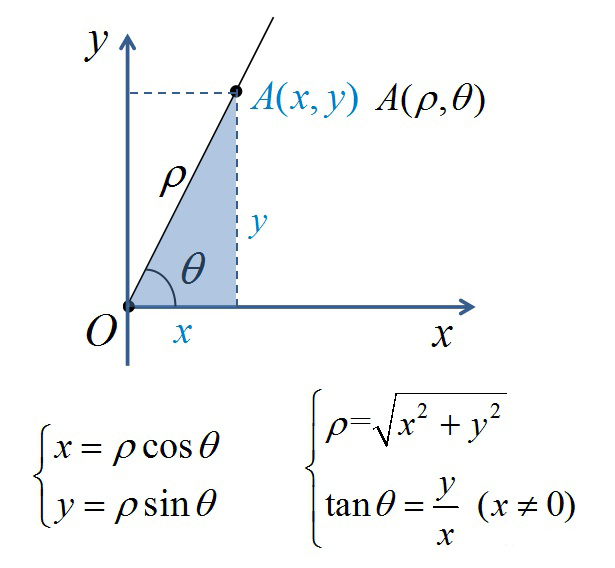
对于图中的 A 点,在传统的笛卡尔直角坐标系中表示为 (x, y),其中 x 值为 A 点在 x 轴的投影长度,y 值为 A 点在 y 轴的投影长度,A 的位置范围为矩形。
而如果使用极坐标系,则 A 点表示为 (ρ,θ),其中ρ值为 A 点距离坐标原点 O 的距离,θ值为 AO 与 x 轴正方向的夹角,A 的位置范围为圆形。
序列帧动画
代码
fold title:代码1
2
3
4
5
6
7
8
9
10
11
12
13
14
15
16
17
18
19
20
21
22
23
24
25
26
27
28
29
30
31
32
33
34
35
36
37
38
39
40
41
42
43
44
45
46
47
48
49
50
51
52
53
54
55
56
57
58
59
60
61
62
63
64
65
66
67
68
69
70
71
72
73
74
75
76
77
78
79
80
81
82
83
84
85
86
87
88
89
90
91
92
93
94
| Shader "Custom/SimplerColor"
{
Properties
{
[MainTexture] _MainTex ("MainTex", 2D) = "white" {}
[MainColor] _BaseColor("BaseColor", Color) = (1,1,1,1)
_RowCount("每行序列帧数", Range(0,50)) = 8
_ColCount("每列序列帧数", Range(0,50)) = 8
_Speed("速度", Range(0,10)) = 1
}
SubShader
{
Tags
{
"RenderPipeline" = "UniversalPipeline"
"RenderType"="Transparent"
"Queue"="Transparent"
}
HLSLINCLUDE
#include "Packages/com.unity.render-pipelines.universal/ShaderLibrary/Core.hlsl"
CBUFFER_START(UnityPerMaterial)
float4 _BaseColor;
float4 _MainTex_ST;
float _RowCount;
float _ColCount;
float _Speed;
CBUFFER_END
TEXTURE2D(_MainTex);
SAMPLER(sampler_MainTex);
struct Attributes
{
float4 positionCS : POSITION;
float2 uv : TEXCOORD0;
};
struct Varyings
{
float4 positionCS : SV_POSITION;
float2 uv : TEXCOORD0;
};
ENDHLSL
Pass
{
Tags
{
"LightMode" = "UniversalForward"
}
Blend SrcAlpha OneMinusSrcAlpha
Cull Off
ZWrite Off
HLSLPROGRAM
#pragma vertex vert
#pragma fragment frag
Varyings vert(Attributes input)
{
Varyings output = (Varyings)0;
output.positionCS = TransformObjectToHClip(input.positionCS.xyz);
output.uv =input.uv.xy * _MainTex_ST.xy + _MainTex_ST.zw;
return output;
}
float4 frag(Varyings input) : SV_Target
{
float time = floor(_Time.y* _Speed);
float row = floor(time / _RowCount);
float col = time - row * _ColCount;
float2 uv = float2(input.uv.x / _RowCount, input.uv.y / _ColCount);
uv.x += col / _RowCount;
uv.y -= row / _ColCount;
float4 MainTex = SAMPLE_TEXTURE2D(_MainTex, sampler_MainTex, uv);
float4 finalColor = MainTex * _BaseColor;
return finalColor;
}
ENDHLSL
}
}
FallBack "Packages/com.unity.render-pipelines.universal/FallbackError"
}
|
原理
使用数字来代表每个动画的位置,序列帧从左上角开始播放。UV 坐标以左下角为原点
![[8545b84a8c2beeadcd70095e1eb865d5_MD5.png]] ![[25a773740a726229a9ffc8d905fe6d5b_MD5.jpg|384]]
数字增长方式 U 是从左到右,V 是从上倒下。
改下图片
![[700a4d79846203502b379330568712e5_MD5.jpg]]
使用一个符合 UV 增长方式的排列。
接下来使用上面的图片来制作 Shader
需要添加 3 个参数来控制显示范围。
1
2
3
| _X_Sum("序列水平个数",float) = 3
_Y_Sum("序列竖直个数",float) = 3
_ShowID("当前显示ID",float) = 0
|
首先需要吧_ShowID 的一个数据转换为二维坐标
首先获得 V 的坐标系数据
![[d28e2d5ab4676c68fd68464870cf845d_MD5.jpg]]
1
2
3
4
5
6
7
8
9
10
11
|
_ShowID = _ShowID % (_X_Sum*_Y_Sum);
_ShowID = floor(_ShowID);
float indexY = floor(_ShowID / _X_Sum);
float indexX = _ShowID - _X_Sum * indexY;
|
![[966c31aca74b36ce1490fd61a31774b4_MD5.jpg]]
接下来吧 0~1 的原始 UV 约束进一个数字上使用 AnimUV 记录
1
2
|
float2 AnimUV = float2(i.uv.x / _X_Sum, i.uv.y / _Y_Sum);
|
获得默认位置显示 “0”
![[76721c476d50ebcbea483d893e54ae77_MD5.jpg]]
添加左右横向偏移
1
2
|
AnimUV.x += indexX / _X_Sum ;
|
累加结果
![[e9145ccc73395853b7d1b5ac9ae54576_MD5.jpg]]
添加上下纵向偏移
1
2
|
AnimUV.y +=indexY / _YSum;
|
![[c23058712239a7502f22f36519917505_MD5.jpg]]
一般这样就可以直接使用新的 AnimUV 获取图像了。
但是很多软件自动生成序列是这样的。
![[fd84a94aaa016eaeb9891aadd4849dfc_MD5.jpg]]
把
1
2
|
AnimUV.y +=indexY / _YSum;
|
改为
1
2
|
AnimUV.y +=(_Y_Sum-1 - indexY )/ _Y_Sum;
|
带入刚才的计算
![[9f4987808275aacfab1f390d6438c39b_MD5.jpg]]
最后获得贴图
1
2
|
fixed4 col = tex2D(_MainTex, AnimUV);
|
源码
fold1
2
3
4
5
6
7
8
9
10
11
12
13
14
15
16
17
18
19
20
21
22
23
24
25
26
27
28
29
30
31
32
33
34
35
36
37
38
39
40
41
42
43
44
45
46
47
48
49
50
51
52
53
54
55
56
57
58
59
60
61
62
63
64
65
66
67
68
69
70
71
72
73
74
75
76
77
78
79
80
81
82
83
84
85
86
87
88
89
90
91
| Shader "CRLuo/CRLuo_Teaching14_Tex_Amin"
{
Properties
{
[NoScaleOffset]
_MainTex ("Texture", 2D) = "white" {}
_X_Sum("序列水平个数",float) = 3
_Y_Sum("序列竖直个数",float) = 3
_ShowID("当前显示ID",float) = 0
}
SubShader
{
Tags { "RenderType"="Opaque" }
LOD 100
Pass
{
CGPROGRAM
#pragma vertex vert
#pragma fragment frag
#pragma multi_compile_fog
#include "UnityCG.cginc"
struct appdata
{
float4 vertex : POSITION;
float2 uv : TEXCOORD0;
};
struct v2f
{
float2 uv : TEXCOORD0;
UNITY_FOG_COORDS(1)
float4 vertex : SV_POSITION;
};
sampler2D _MainTex;
float _X_Sum;
float _Y_Sum;
float _ShowID;
v2f vert (appdata v)
{
v2f o;
o.vertex = UnityObjectToClipPos(v.vertex);
o.uv = v.uv;
UNITY_TRANSFER_FOG(o,o.vertex);
return o;
}
fixed4 frag (v2f i) : SV_Target
{
_ShowID = _ShowID % (_X_Sum*_Y_Sum);
_ShowID = floor(_ShowID);
float indexY = floor(_ShowID / _X_Sum);
float indexX = _ShowID - _X_Sum * indexY;
float2 AnimUV = float2(i.uv.x / _X_Sum, i.uv.y / _Y_Sum);
AnimUV.x += indexX / _X_Sum ;
AnimUV.y +=(_Y_Sum-1 - indexY )/ _Y_Sum;
fixed4 col = tex2D(_MainTex, AnimUV);
clip(col.a - 0.5);
UNITY_APPLY_FOG(i.fogCoord, col);
return col;
}
ENDCG
}
}
}
|
uv 扰动
![[flow.gif]]
Flow 流动
使用一张噪声图
![[Pasted image 20221020212222.png|300]]
1
2
3
4
5
6
7
8
9
10
11
12
13
14
15
16
17
18
19
20
21
22
23
24
25
26
27
28
29
30
31
32
33
34
35
36
37
38
39
40
41
42
43
44
45
46
47
48
49
50
51
52
53
54
55
56
57
58
59
60
61
62
63
64
65
66
67
68
69
70
71
72
73
74
75
76
77
78
79
80
| Shader "Unlit/Flow"
{
Properties
{
_MainTex ("RGB:颜色 A:透贴", 2D) = "white" {}
_Opacity("透明度",Range(0,1)) = 0.5
_NoiseTex("噪声图",2d) = "grey"{}
_NoiseScale("噪声强度",range(0,5)) = 0.5
_FlowSpeed("流动速度",range(0,10)) = 5
}
SubShader {
Tags {
"Queue"="Transparent"
"RenderType"="Transparent"
"ForceNoShadowCasting"="True"
"IgnoreProjector"="True"
}
Pass {
Name "FORWARD"
Tags {
"LightMode"="ForwardBase"
}
Zwrite Off
Blend One OneMinusSrcAlpha
CGPROGRAM
#pragma vertex vert
#pragma fragment frag
#include "UnityCG.cginc"
#pragma multi_compile_fwdbase
sampler2D _MainTex;
float4 _MainTex_ST;
sampler2D _NoiseTex;
float4 _NoiseTex_ST;
float _Opacity;
float _NoiseScale;
float _FlowSpeed;
struct appdata { unity TRANSFORM_TEX
float4 vertex : POSITION;
float2 uv : TEXCOORD0;
};
struct v2f {
float4 pos : SV_POSITION;
float2 uv0 : TEXCOORD0;
float2 uv1 : TEXCOORD1;
};
v2f vert (appdata v) {
v2f o = (v2f)0;
o.pos = UnityObjectToClipPos( v.vertex);
o.uv0 = v.uv;
o.uv1 = TRANSFORM_TEX(v.uv, _NoiseTex);
o.uv1.y = o.uv1.y + frac(-_Time.x * _FlowSpeed);
return o;
}
float4 frag(v2f i) : COLOR {
float4 MainTex = tex2D(_MainTex,i.uv0);
float NoiseTex = tex2D(_NoiseTex, i.uv1).r;
float3 finalColor = MainTex.rgb;
float noise = lerp(1.0, NoiseTex * 2.0, _NoiseScale);
noise = max(0.0,noise);
float opacity = MainTex.a * _Opacity * noise;
return float4(finalColor * opacity,opacity);
}
ENDCG
}
}
}
|
加 frac 的意义:(保证安全)
1. time 一直增长,取小数可以防止数字无限大,最后导致数值溢出,图像花掉
2. 浮点精度问题导致图像花掉
![[Pasted image 20221020211640.png|300]]
Wrap 扭曲
使用一张扭曲图
R、G 通道:扭曲图
B 通道:噪声图
![[Pasted image 20221020212309.png|300]]
扭曲图制作方法
![[AP01_L15_13.jpg]]
1
2
3
4
5
6
7
8
9
10
11
12
13
14
15
16
17
18
19
20
21
22
23
24
25
26
27
28
29
30
31
32
33
34
35
36
37
38
39
40
41
42
43
44
45
46
47
48
49
50
51
52
53
54
55
56
57
58
59
60
61
62
63
64
65
66
67
68
69
70
71
72
73
74
| Shader "Unlit/Warp"
{
Properties
{
_MainTex ("RGB:颜色 A:透贴", 2D) = "white" {}
_Opacity("透明度",Range(0,1)) = 0.5
_WarpTex("扭曲图",2d) = "grey"{}
_WarpScale("扭曲强度",range(0,1)) = 0.5
_NoiseScale("噪声强度",range(0,5)) = 0.5
_FlowSpeed("流动速度",range(0,10)) = 5
}
SubShader {
Tags {
"Queue"="Transparent"
"RenderType"="Transparent"
"ForceNoShadowCasting"="True"
"IgnoreProjector"="True"
}
Pass {
Name "FORWARD"
Tags {
"LightMode"="ForwardBase"
}
Zwrite Off
Blend One OneMinusSrcAlpha
CGPROGRAM
#pragma vertex vert
#pragma fragment frag
#include "UnityCG.cginc"
#pragma multi_compile_fwdbase
sampler2D _MainTex;
float4 _MainTex_ST;
sampler2D _WarpTex;
float4 _WarpTex_ST;
float _Opacity;
float _WarpScale;
float _NoiseScale;
float _FlowSpeed;
struct appdata {
float4 vertex : POSITION;
float2 uv : TEXCOORD0;
};
struct v2f {
float4 pos : SV_POSITION;
float2 uv0 : TEXCOORD0;
float2 uv1 : TEXCOORD1;
};
v2f vert (appdata v) {
v2f o = (v2f)0;
o.pos = UnityObjectToClipPos( v.vertex);
o.uv0 = v.uv;
o.uv1 = TRANSFORM_TEX(v.uv, _WarpTex);
o.uv1.y = o.uv1.y + frac(-_Time.x * _FlowSpeed);
return o;
}
float4 frag(v2f i) : COLOR {
float3 WarpTex = tex2D(_WarpTex, i.uv1).rgb;
float2 uvBias = (WarpTex.rg - 0.5) * _WarpScale;
float4 MainTex = tex2D(_MainTex,i.uv0 + uvBias);
float3 finalColor = MainTex. rgb;
float noise = lerp (1.0, WarpTex. b * 2.0, _NoiseScale);
noise = max(0.0,noise);
float opacity = MainTex.a * _Opacity * noise;
return float4(finalColor * opacity,opacity);
}
ENDCG
}
}
}
|
卡通火
![[tong.gif|300]]
贴图解析
Mask
![[Pasted image 20221020220057.png|300]]
R 通道:红色为外焰
![[Pasted image 20221020220642.png|300]]
G 通道:绿色为内焰
![[Pasted image 20221020220650.png|300]]
B 通道:透贴,下面是黑色
![[Pasted image 20221020231613.png|300]]
A 通道:控制火焰强度,白色部分强,黑色部分弱
![[Pasted image 20221020220611.png|300]]
噪声图
![[Pasted image 20221020220234.png|300]]
RG 通道分别为两种不同的噪声图,对这两张 noise 做不同的偏移,混合占比不同,流动速度不同,可以混合出一张随机性比较强的噪声图
R 通道:
![[Pasted image 20221020220319.png|300]]
G 通道:
![[Pasted image 20221020220333.png|300]]
代码
1
2
3
4
5
6
7
8
9
10
11
12
13
14
15
16
17
18
19
20
21
22
23
24
25
26
27
28
29
30
31
32
33
34
35
36
37
38
39
40
41
42
43
44
45
46
47
48
49
50
51
52
53
54
55
56
57
58
59
60
61
62
63
64
65
66
67
68
69
70
71
72
73
74
75
76
77
78
79
80
81
82
83
84
85
86
87
88
| Shader "Unlit/Fire"
{
Properties
{
_Mask ("R:外焰 G:内焰 B:透贴", 2D) = "blue" {}
_Noise("R:噪声1 G:噪声2", 2D) = "gray"{}
_Noise1Params("X:大小 Y:流速 Z:强度", vector) = (1,0.2,0.2,1)
_Noise2Params("X:大小 Y:流速 Z:强度", vector) = (1,0.2,0.2,1)
[HDR]_Color1 ("外焰颜色", color) = (1,1,1,1)
[HDR]_Color2 ("内焰颜色", color) = (1,1,1,1)
}
SubShader
{
Tags
{ "Queue" = "Transparent"
"RenderType"="Transparent"
"ForceNoShadowCasting" = "True"
"IgnoreProjector" = "True"
}
Pass
{
Name "FORWARD"
Tags
{ "LightMode" = "ForwardBase" }
Blend One OneMinusSrcAlpha
CGPROGRAM
#pragma vertex vert
#pragma fragment frag
#pragma multi_compile_fwdbase_fullshadows
#include "UnityCG.cginc"
struct appdata
{
float4 vertex : POSITION;
float2 uv : TEXCOORD0;
};
struct v2f
{
float4 pos : SV_POSITION;
float2 uv0 : TEXCOORD0;
float2 uv1 : TEXCOORD1;
float2 uv2 : TEXCOORD3;
};
sampler2D _Mask;
float4 _Mask_ST;
sampler2D _Noise;
float3 _Noise1Params;
float3 _Noise2Params;
float3 _Color1;
float3 _Color2;
v2f vert (appdata v)
{
v2f o;
o.pos = UnityObjectToClipPos(v.vertex);
o.uv0 = TRANSFORM_TEX(v.uv, _Mask);
o.uv1 = v.uv * _Noise1Params.x - float2(0 ,frac(_Time.x * _Noise1Params.y));
o.uv2 = v.uv * _Noise2Params.x - float2(0, frac(_Time.x * _Noise2Params.y));
return o;
}
float4 frag (v2f i) : SV_Target
{
half warpMask = tex2D (_Mask, i.uv0). b;
float noise1 = tex2D(_Noise, i.uv1).r;
float noise2 = tex2D (_Noise, i.uv2). g;
float noise = noise1 * _Noise1Params.z + noise2 * _Noise2Params.z;
float2 warpUV = i.uv0 - float2(0, noise) * warpMask;
float4 mask = tex2D(_Mask, warpUV);
float3 finalColor = (_Color1 * mask.r + _Color2 * mask.g) * mask.a;
float opacity = mask.r + mask.g;
return float4(finalColor,opacity);
}
ENDCG
}
}
}
|
卡通水
贴图解析
MainTex
![[Pasted image 20221021220922.png]]
扭曲图 Warp
![[Pasted image 20221021211312.png]]
代码
1
2
3
4
5
6
7
8
9
10
11
12
13
14
15
16
17
18
19
20
21
22
23
24
25
26
27
28
29
30
31
32
33
34
35
36
37
38
39
40
41
42
43
44
45
46
47
48
49
50
51
52
53
54
55
56
57
58
59
60
61
62
63
64
65
66
67
68
69
70
71
72
73
74
75
76
77
78
| Shader "Unlit/CartoomWater"
{
Properties
{
_MainTex ("颜色贴图", 2D) = "blue" {}
_WarpTex("扰动图", 2D) = "gray"{}
_Speed("X:流速X Y:流速Y", vector) = (1.0, 1.0, 0.5, 1.0)
_Warp1Params("X:大小 Y:流速X Z:流速Y W:强度", vector) = (1.0, 1.0, 0.5, 1.0)
_Warp2Params("X:大小 Y:流速X Z:流速Y W:强度", vector) = (2.0, 0.5, 0.5, 1.0)
}
SubShader
{
Tags
{
"RenderType"="Opaque"
}
Pass
{
Name "FORWARD"
Tags
{ "LightMode" = "ForwardBase" }
Blend One OneMinusSrcAlpha
CGPROGRAM
#pragma vertex vert
#pragma fragment frag
#pragma multi_compile_fwdbase_fullshadows
#include "UnityCG.cginc"
struct appdata
{
float4 vertex : POSITION;
float2 uv : TEXCOORD0;
};
struct v2f
{
float4 pos : SV_POSITION;
float2 uv0 : TEXCOORD0;
float2 uv1 : TEXCOORD1;
float2 uv2 : TEXCOORD3;
};
sampler2D _MainTex;
float4 _MainTex_ST;
sampler2D _WarpTex;
float2 _Speed;
float4 _Warp1Params;
float4 _Warp2Params;
v2f vert (appdata v)
{
v2f o;
o.pos = UnityObjectToClipPos(v.vertex);
o.uv0 = v.uv - frac(_Time.x * _Speed);
o.uv1 = v.uv * _Warp1Params.x - frac(_Time.x * _Warp1Params.yz);
o.uv2 = v.uv * _Warp2Params.x - frac(_Time.x * _Warp2Params.yz);
return o;
}
float4 frag (v2f i) : SV_Target
{
float3 warp1 = tex2D (_WarpTex, i.uv1). rgb;
float3 warp2 = tex2D(_WarpTex, i.uv2).rgb;
float2 warp = (warp1.xy - 0.5) * _Warp1Params.w * (warp2.xy - 0.5) * _Warp2Params.w;
float2 warpUV = i.uv0 + warp;
float3 MainTex = tex2D(_MainTex, warpUV);
return float4(MainTex,1);
}
ENDCG
}
}
}
|

 微信
微信 支付宝
支付宝