1 GUI/GUILayout [[《GUI》#GUI]]
关键字 :GameView GUI, MonoBehaviour.OnGUI()
UnityEngine. GUI :可以用于运行时(在 Game 视图中显示)/ 编辑器(诸如在 Inspector)面板下显示相关 UI 组件与内容,需要自行计算 Rect [[1 前言]] ( https://zhuanlan.zhihu.com/p/503154643#ref_1 )
Rect Unity Rect 官方文档
UnityEngine. GUILayout :是基于 GUI 的实现,自动进行排版,计算坐标与宽高。
2 EditorGUI/EditorGUILayout 关键字 :编辑器扩展,Editor ,EditorWindow
UnityEditor. EditorGUI :只可用于编辑器,需要自行计算 Rect。
UnityEditor. EditorGUILayout :只可用于编辑器,自动计算 Rect
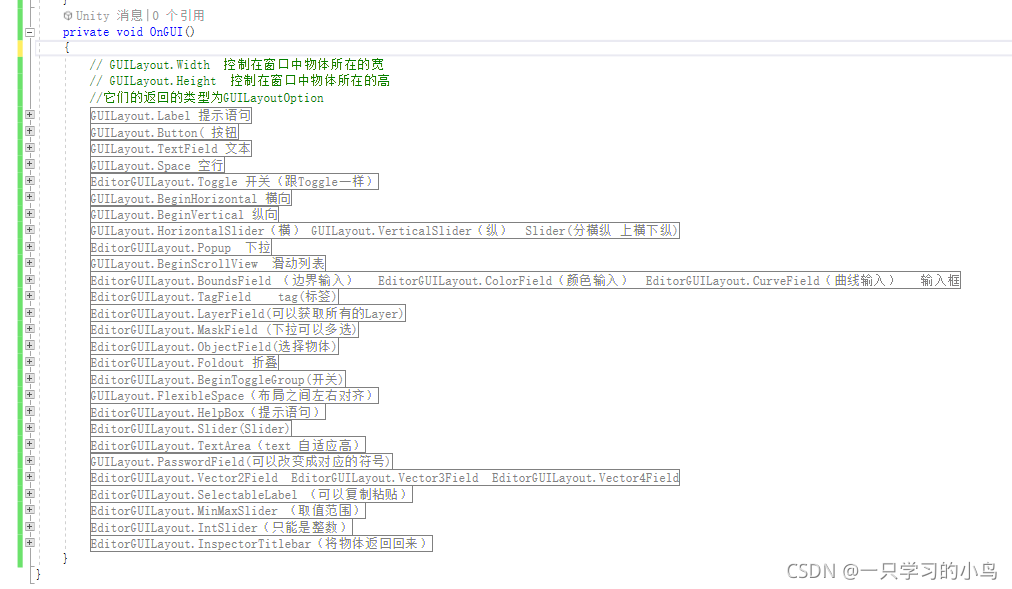
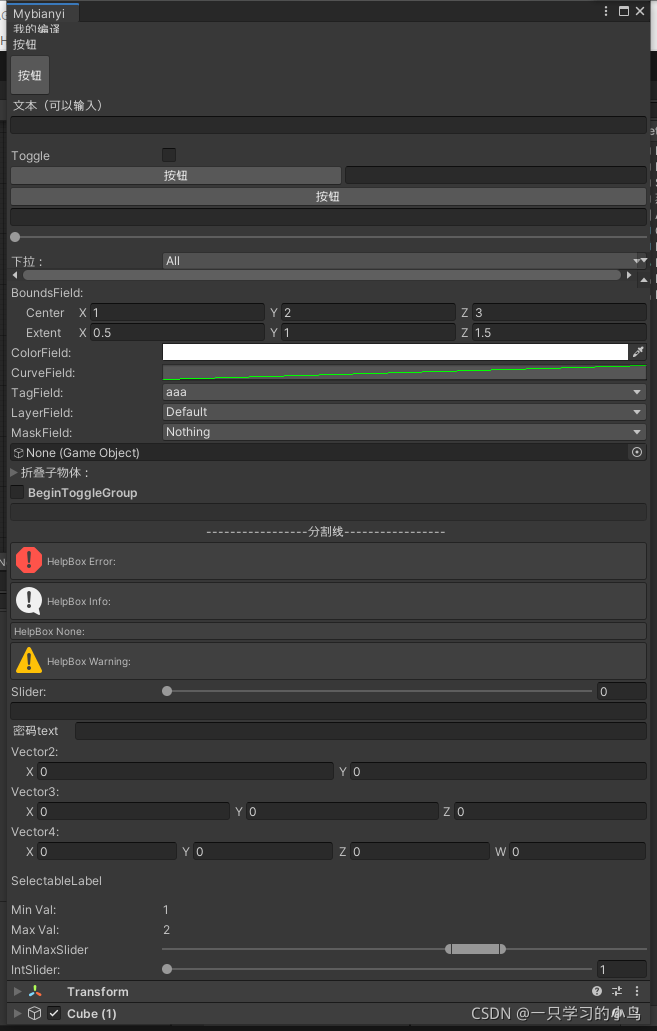
汇总
关于效果图最后它的代码我隐藏掉了如何想看看可以自行打开
1
2
3
4
5
6
7
8
9
10
11
12
13
14
15
16
17
18
19
20
21
22
23
24
25
26
27
28
29
30
31
32
33
34
35
36
37
38
39
40
41
42
43
44
45
46
47
48
49
50
51
52
53
54
55
56
57
58
59
60
61
62
63
64
65
66
67
68
69
70
71
72
73
74
75
76
77
78
79
80
81
82
83
84
85
86
87
88
89
90
91
92
93
94
95
96
97
98
99
100
101
102
103
104
105
106
107
108
109
110
111
112
113
114
115
116
117
118
119
120
121
122
123
124
125
126
127
128
129
130
131
132
133
134
135
136
137
138
139
140
141
142
143
144
145
146
147
148
149
150
151
152
153
154
155
156
157
158
159
160
161
162
163
164
165
166
167
168
169
170
171
172
173
174
175
176
177
178
179
180
181
182
183
184
185
186
187
188
189
190
191
192
193
194
195
196
using System.Collections;using System.Collections.Generic;using UnityEngine;using UnityEditor; public class Mybianyi : EditorWindow { string PasswordField = "" ; string m_textArea = "" ; float sliders = 0 ; int slidera = 0 ; string BeginToggleGroup = "BeginToggleGroup" ; bool ToggleGroup = false ; string Textfield = "" ; bool fg = false ; float sum = 0 ; int count = 0 ; string tag = "aaa" ; int Layerfield=0 ; string [] pathname = new string [] { "All" , "Asset" , "..." }; float minVal = 1 ; float maxVal = 2 ; float minLimit = -5 ; float maxLimit = 5 ; static Vector3 center = new Vector3(1 , 2 , 3 ); static Vector3 size1 = new Vector3(1 , 2 , 3 ); Bounds _bounds = new Bounds(center, size1); Color m_color = Color.white; AnimationCurve m_curve = AnimationCurve.Linear(0 , 0 , 10 , 10 ); Vector2 size = new Vector2(100 ,100 ); int flags = 0 ; string [] options = new string [] { "CanJump" , "CanShoot" , "CanSwim" ,"Canabc" ,"Canacc" }; GameObject game ; bool showFoldout; Vector2 m_vector2 = new Vector2(); Vector3 m_vector3 = new Vector3(); Vector4 m_vector4 = new Vector4(); Transform selectedTransform; GameObject selectedGameObject; bool fold; bool fold2; [MenuItem("MyWindow/Window" ) ] static void window () { Mybianyi mybianyi = GetWindow<Mybianyi>(); mybianyi.Show(); } private void OnGUI () { #region GUILayout.Label 提示语句 GUILayout.Label("我的编译器(My compiler)" , GUILayout.Width(50 ), GUILayout.Height(10 )); #endregion #region GUILayout.Button( 按钮 GUILayout.Label("按钮" ); if ( GUILayout.Button("按钮" , GUILayout.Width(40 ), GUILayout.Height(40 ))) { } #endregion #region GUILayout.TextField 文本 GUILayout.Label("文本(可以输入)" ); Textfield = GUILayout.TextField(Textfield); #endregion #region GUILayout.Space 空行 GUILayout.Space(10 ); #endregion #region EditorGUILayout.Toggle 开关(跟Toggle一样) fg = EditorGUILayout.Toggle("Toggle" , fg); #endregion #region GUILayout.BeginHorizontal 横向 GUILayout.BeginHorizontal(); GUILayout.Button("按钮" ); Textfield = GUILayout.TextField(Textfield); GUILayout.EndHorizontal(); #endregion #region GUILayout.BeginVertical 纵向 GUILayout.BeginVertical(); GUILayout.Button("按钮" ); Textfield = GUILayout.TextField(Textfield); GUILayout.EndVertical(); #endregion #region GUILayout.HorizontalSlider(横) GUILayout.VerticalSlider(纵) Slider(分横纵 上横下纵) sum = GUILayout.HorizontalSlider(sum, 0 , 10 ); GUILayout.Space(20 ); #endregion #region EditorGUILayout.Popup 下拉 count = EditorGUILayout.Popup("下拉:" ,count,pathname); #endregion #region GUILayout.BeginScrollView 滑动列表 size = GUILayout.BeginScrollView(size,true ,true ); GUILayout.EndScrollView(); #endregion #region EditorGUILayout.BoundsField (边界输入) EditorGUILayout.ColorField(颜色输入) EditorGUILayout.CurveField(曲线输入) 输入框 _bounds = EditorGUILayout.BoundsField("BoundsField:" , _bounds); m_color = EditorGUILayout.ColorField("ColorField:" , m_color); m_curve = EditorGUILayout.CurveField("CurveField:" , m_curve); #endregion #region EditorGUILayout.TagField tag(标签) tag = EditorGUILayout.TagField("TagField:" , tag); #endregion #region EditorGUILayout.LayerField(可以获取所有的Layer) Layerfield = EditorGUILayout.LayerField("LayerField:" , Layerfield); #endregion #region EditorGUILayout.MaskField (下拉可以多选) flags = EditorGUILayout.MaskField("MaskField:" , flags, options); #endregion #region EditorGUILayout.ObjectField(选择物体) game = (GameObject) EditorGUILayout.ObjectField(game,typeof (GameObject),true ); #endregion #region EditorGUILayout.Foldout 折叠 showFoldout = EditorGUILayout.Foldout(showFoldout, "折叠子物体:" ); if (showFoldout) { EditorGUI.indentLevel++; EditorGUILayout.LabelField("折叠块内容1" ); EditorGUI.indentLevel++; EditorGUILayout.LabelField("折叠块内容2" ); EditorGUI.indentLevel--; EditorGUI.indentLevel--; EditorGUILayout.LabelField("折叠块内容3" ); } #endregion #region EditorGUILayout.BeginToggleGroup(开关) ToggleGroup = EditorGUILayout.BeginToggleGroup(BeginToggleGroup, ToggleGroup); Textfield = GUILayout.TextField(Textfield); EditorGUILayout.EndToggleGroup(); #endregion #region GUILayout.FlexibleSpace(布局之间左右对齐) EditorGUILayout.BeginHorizontal(); GUILayout.FlexibleSpace(); GUILayout.Label("-----------------分割线-----------------" ); GUILayout.FlexibleSpace(); EditorGUILayout.EndHorizontal(); #endregion #region EditorGUILayout.HelpBox(提示语句) EditorGUILayout.HelpBox("HelpBox Error:" , MessageType.Error); EditorGUILayout.HelpBox("HelpBox Info:" , MessageType.Info); EditorGUILayout.HelpBox("HelpBox None:" , MessageType.None); EditorGUILayout.HelpBox("HelpBox Warning:" , MessageType.Warning); #endregion #region EditorGUILayout.Slider(Slider) sliders = EditorGUILayout.Slider("Slider:" ,sliders,0 ,10 ); #endregion #region EditorGUILayout.TextArea(text 自适应高) m_textArea = EditorGUILayout.TextArea(m_textArea); #endregion #region GUILayout.PasswordField(可以改变成对应的符号) EditorGUILayout.BeginHorizontal(); GUILayout.Label("密码text" , GUILayout.Width(60 )); PasswordField = GUILayout.PasswordField(PasswordField, '*' ); EditorGUILayout.EndHorizontal(); #endregion #region EditorGUILayout.Vector2Field EditorGUILayout.Vector3Field EditorGUILayout.Vector4Field m_vector2 = EditorGUILayout.Vector2Field("Vector2:" , m_vector2); m_vector3 = EditorGUILayout.Vector3Field("Vector3:" , m_vector3); m_vector4 = EditorGUILayout.Vector4Field("Vector4:" , m_vector4); #endregion #region EditorGUILayout.SelectableLabel (可以复制粘贴) EditorGUILayout.SelectableLabel("SelectableLabel" ); #endregion #region EditorGUILayout.MinMaxSlider (取值范围) EditorGUILayout.LabelField("Min Val:" , minVal.ToString()); EditorGUILayout.LabelField("Max Val:" , maxVal.ToString()); EditorGUILayout.MinMaxSlider("MinMaxSlider" , ref minVal, ref maxVal, minLimit, maxLimit); #endregion #region EditorGUILayout.IntSlider(只能是整数) slidera = EditorGUILayout.IntSlider("IntSlider:" , slidera, 1 , 10 ); #endregion #region EditorGUILayout.InspectorTitlebar(将物体返回回来) #endregion } }
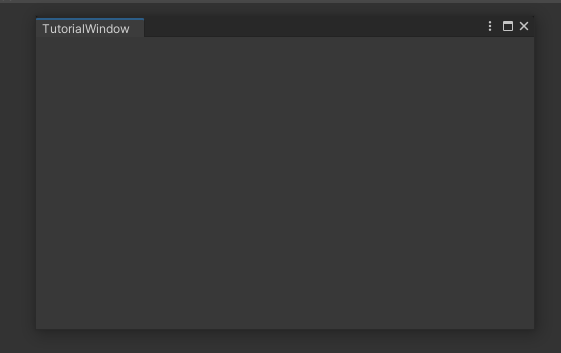
一、Editor 的基本面板 1. 浮动窗口(EditorWindow) 关键字:UnityEditor.EditorWindow,MenuItem
样例:
示例代码:
1
2
3
4
5
6
7
8
9
10
11
12
13
14
15
16
17
18
19
20
using UnityEditor;public class TutorialWindow : EditorWindow { private static TutorialWindow window; [MenuItem("MyWindows/TutorialWindow" ) ] public static void OpenWindow () { window = GetWindow<TutorialWindow>(false , "TutorialWindow" , true ); window.Show(); } private void OnGUI () { } }
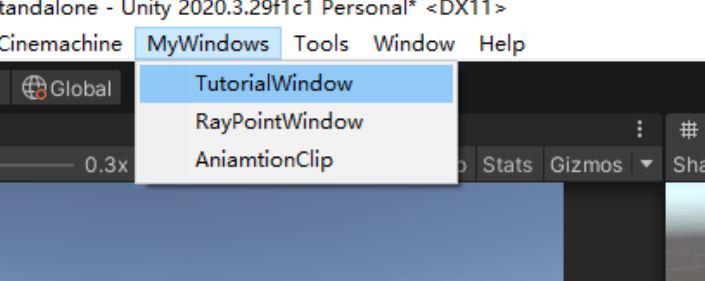
在 Unity3d 上方菜单栏,我们可以看见:
点击就可以生成自定义窗口啦。
之后所有 EditorWindow的 GUI 绘制,都是在 OnGUI() 函数中,为了预览方便,后续只会给出核心代码,实际上都是放在 OnGUI() 中。
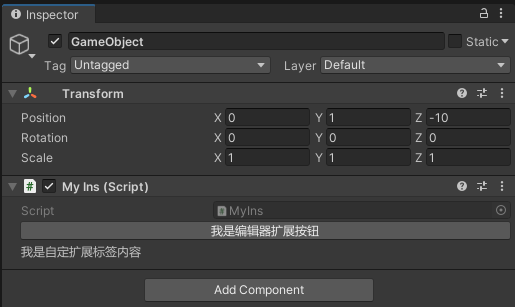
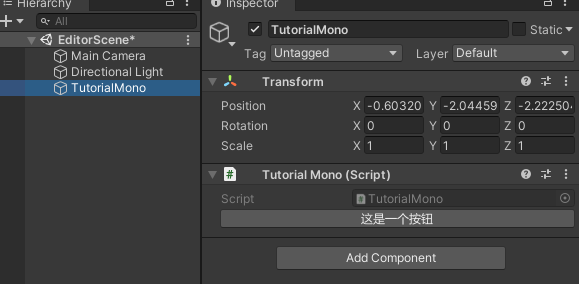
2. 检视面板(Inspector) 关键字:UnityEditor.Editor, CustomEditor
样例:
Mono 代码:
1
2
3
public class TutorialMono : MonoBehaviour { }
Editor 代码:
1
2
3
4
5
6
7
8
9
10
11
12
13
14
15
16
17
18
19
20
21
22
23
24
25
26
27
28
using UnityEditor;using UnityEngine;[CustomEditor(typeof(TutorialMono)) ] public class TutorialMonoInspector : Editor { private TutorialMono m_target; private void OnEnable () { m_target = target as TutorialMono; } public override void OnInspectorGUI () { base .OnInspectorGUI(); if (GUILayout.Button("这是一个按钮" )) { Debug.Log("Hello world" ); } } }
之后 Inspector 面板的所有的 GUI 绘制,都是在 OnInspectorGUI() 函数中,为了预览方便,后续只会给出核心代码,实际上都是放在 OnInspectorGUI() 中。
二、按钮控件 关键字: GUILayout.Button
样例:
示例代码:
1
2
3
4
if (GUILayout.Button("这是一个按钮")) { Debug.Log("按了下按钮"); }
关键字: EditorGUILayout.DropdownButton
样例:
示例代码:
1
2
3
4
5
6
private GUIContent content = new GUIContent("DropdownButton" ); ... if (EditorGUILayout.DropdownButton(content, FocusType.Passive)){ Debug.Log("按下就触发,而不是抬起" ); }
看了看官方描述也是云里雾里,反正和 Button 的区别就是:
Button 是鼠标抬起触发。
Dropdown 是鼠标按下就触发。
咱也不是很清楚,几乎没用过这个组件,粗略了解就好(逃)。
三、显示域(Field) 1. 对象域(ObjectField) 关键字:EditorGUILayout.ObjectField
样例:
示例代码:
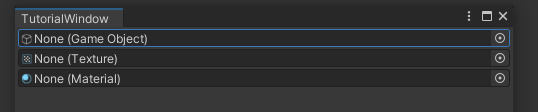
1
2
3
4
5
6
7
private GameObject m_objectValue; ... m_objectValue = EditorGUILayout.ObjectField(m_objectValue, typeof (GameObject), true ) as GameObject;
这个组件几乎是必用控件,Editor 的根本目的就是在编辑模式下,对某些资源对象(Object)进行 “增删改查”。
同时,这个 “Object” 不只是 GameObject,只要是继承 UnityEngine.Object 的类型,都可以用这个方法来获取,比如:Texture,Material 等等。
值得注意的是,所有的 “Field” 类,如果不把数据放在左边赋值,那么在输入框内的修改将不会保存。
(仔细想想这个代码逻辑是这样的),这个特性可以拿来显示某些 “只读” 数据。
2. 整数域(IntField) 关键字:EditorGUILayout.IntField
样例:
示例代码:
1
2
3
private int m_intValue; //定义修改内容; ... m_intValue = EditorGUILayout.IntField("整型输入框", m_intValue); //Title + Value
3. 浮点、字符串、向量等各种域 关键字:FloatField, TextField,Vector3Field…
样例:
示例代码:
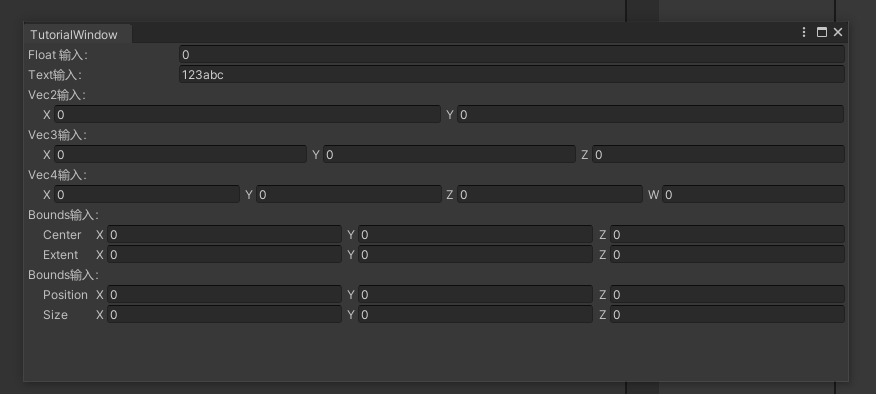
1
2
3
4
5
6
7
8
9
10
11
12
13
14
15
private string m_textValue; private float m_floatValue; private Vector2 m_vec2; private Vector3 m_vec3; private Vector4 m_vec4; private Bounds m_bounds; private BoundsInt m_boundsInt; ... m_floatValue = EditorGUILayout.FloatField("Float 输入:", m_floatValue); m_textValue = EditorGUILayout.TextField("Text输入:", m_textValue); m_vec2 = EditorGUILayout.Vector2Field("Vec2输入: ", m_vec2); m_vec3 = EditorGUILayout.Vector3Field("Vec3输入: ", m_vec3); m_vec4 = EditorGUILayout.Vector4Field("Vec4输入: ", m_vec4); m_bounds = EditorGUILayout.BoundsField("Bounds输入: ", m_bounds); m_boundsInt = EditorGUILayout.BoundsIntField("Bounds输入: ", m_boundsInt);
4. 标签文本域(LabelField) 关键字:EditorGUILayout.LabelField
样例:
示例代码:
1 EditorGUILayout.LabelField("文本标题", "文本内容");
5. 标签 / 层级选择域(TagField/LayerField ) 关键字:EditorGUILayout.TagField, EditorGUILayout.LayerField
样例:
示例代码:
1
2
3
4
5
private int m_layer; private string m_tag; ... m_layer = EditorGUILayout.LayerField("层级选择", m_layer); m_tag = EditorGUILayout.TagField("标签选择", m_tag);
6. 颜色域(ColorField) 关键字:EditorGUILayout.ColorField
样例:
示例代码:
1
2
3
4
5
6
7
8
9
10
private Color m_color; private GUIContent colorTitle = new GUIContent("颜色选择"); ... //着重强调一下这个重载方法 //第一个参数: GUIContent,通常拿来作为Title //第二个参数: Color,目标修改数据 //第三个参数: bool ,是否显示拾色器 //第四个参数: bool ,是否显示透明度通道 //第五个参数: bool ,是否支持HDR。 m_color = EditorGUILayout.ColorField(colorTitle, m_color, true, true, true);
现在 URP 基本标配,该上 HDR 啦!
7. 动画曲线域(CurveField) 关键字:EditorGUILayout.CurveField, AnimationCurve
样例:
示例代码:
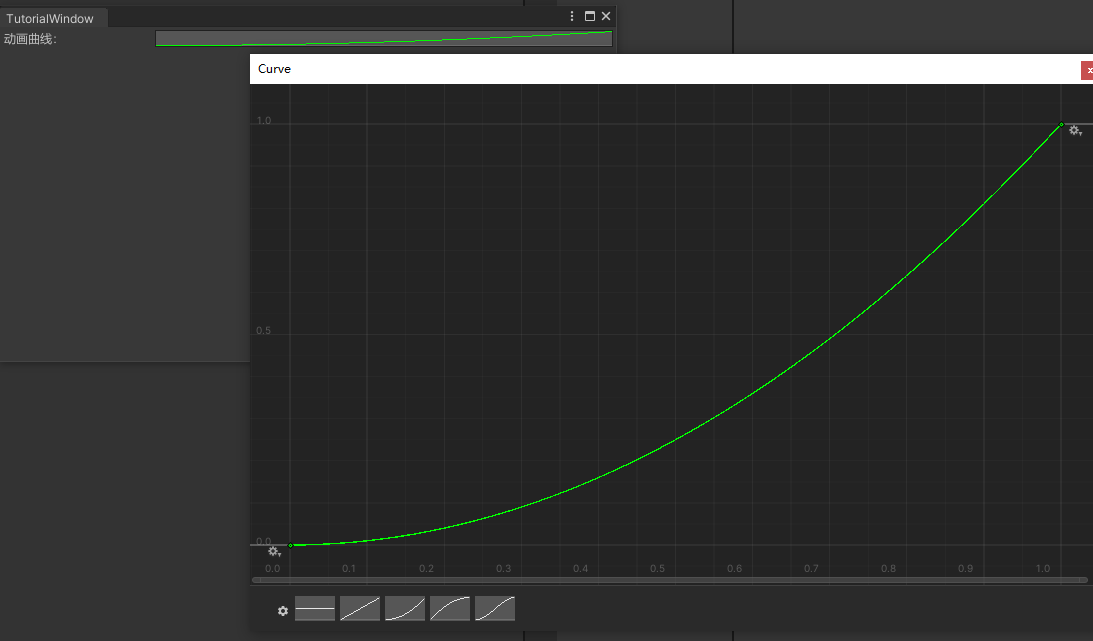
1
2
3
private AnimationCurve m_curve = AnimationCurve.Linear(0, 0, 1, 1); ... m_curve = EditorGUILayout.CurveField("动画曲线:", m_curve);
四、枚举选择 关键字:EditorGUILayout.EnumPopup
样例:
示例代码:
1
2
3
4
5
6
7
8
9
private enum TutorialEnum { One, Two, Three } private TutorialEnum m_enum; ... m_enum = (TutorialEnum)EditorGUILayout.EnumPopup("枚举选择", m_enum);
2. 多选枚举(EnumFlagsField) 关键字:EditorGUILayout.EnumFlagsField
样例:
示例代码:
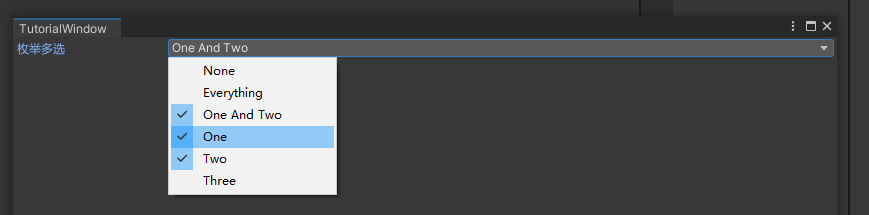
1
2
3
4
5
6
7
8
9
10
11
private enum TutorialEnum { None = 0, OneAndTwo = One | Two, One = 1 << 0, Two = 1 << 1, Three = 1 << 2 } private TutorialEnum m_enum; ... m_enum = (TutorialEnum)EditorGUILayout.EnumFlagsField("枚举多选", m_enum);
关键字: EditorGUILayout.IntPopup, EditorGUILayout.MaskField
样例:
示例代码:
1
2
3
4
5
6
7
8
9
10
private int m_singleInt;private int m_multiInt;private string [] intSelections = new string [] { "整数10" , "整数20" , "整数30" };private string [] intMultiSelections = new string [] { "1号" , "2号" , "3号" };private int [] intValues = new int [] { 10 , 20 , 30 };... m_singleInt = EditorGUILayout.IntPopup("整数单选框" , m_singleInt, intSelections, intValues); EditorGUILayout.LabelField($"m_singleInt is {m_singleInt} " ); m_multiInt = EditorGUILayout.MaskField("整数多选框" , m_multiInt, intMultiSelections); EditorGUILayout.LabelField($"m_multiInt is {m_multiInt} " );
笔者对这种用得少,也不是很熟悉。
五. 折叠栏 1. 折叠(Foldout ) 关键字: EditorGUILayout.Foldout
样例:
示例代码:
1
2
3
4
5
6
7
private bool foldOut;... foldOut = EditorGUILayout.Foldout(foldOut, "一般路过折叠栏" ); if (foldOut) { EditorGUILayout.LabelField("这是折叠标签内容" ); }
2. 折叠组(FoldoutGroup ) 关键字:EditorGUILayout.BeginFoldoutHeaderGroup, EditorGUILayout.EndFoldoutHeaderGroup
样例:
示例代码:
1
2
3
4
5
6
7
8
private bool foldOut;... foldOut = EditorGUILayout.BeginFoldoutHeaderGroup(foldOut, "折叠栏组" ); if (foldOut) { EditorGUILayout.LabelField("这是折叠标签内容" ); } EditorGUILayout.EndFoldoutHeaderGroup();
六. 开关控件 1. 单个开关(Toggle) 关键字: EditorGUILayout.Toggle,EditorGUILayout.ToggleLeft
样例:
示例代码:
1
2
3
4
private bool toggle;... toggle = EditorGUILayout.Toggle("Normal Toggle" , toggle); toggle = EditorGUILayout.ToggleLeft("Left Toggle" , toggle);
2. 开关组(ToggleGroup) 关键字:EditorGUILayout.BeginToggleGroup,EditorGUILayout.EndToggleGroup
样例:
示例代码:
1
2
3
4
5
6
7
private bool toggle;private string m_inputText;... toggle = EditorGUILayout.BeginToggleGroup("开关组" , toggle); EditorGUILayout.LabelField("------Input Field------" ); m_inputText = EditorGUILayout.TextField("输入内容:" , m_inputText); EditorGUILayout.EndToggleGroup();
七. 滑动控件 1. 滑动条(Slider) 关键字:EditorGUILayout.Slider,EditorGUILayout.IntSlider
样例:
示例代码:
1
2
3
4
5
6
7
8
9
10
11
private float m_sliderValue;private int m_sliderIntValue;... m_sliderValue = EditorGUILayout.Slider("滑动条Sample:" , m_sliderValue, 0.123f , 7.77f ); m_sliderIntValue = EditorGUILayout.IntSlider("整数值滑动条" , m_sliderIntValue, 2 , 16 );
2. 双滑块滑动条(MinMaxSlider ) 关键字:EditorGUILayout.MinMaxSlider
样例:
示例代码:
1
2
3
4
5
6
private float m_leftValue;private float m_rightValue;... EditorGUILayout.MinMaxSlider("双块滑动条" , ref m_leftValue, ref m_rightValue, 0.25f , 10.25f ); EditorGUILayout.FloatField("滑动左值:" , m_leftValue); EditorGUILayout.FloatField("滑动右值:" , m_rightValue);
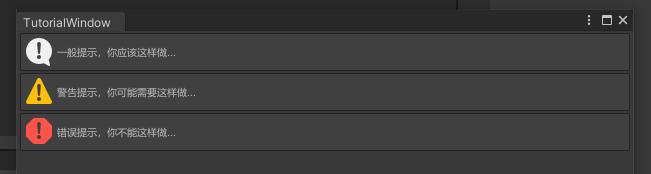
八. 其他控件 1. 帮助框(HelpBox) 关键字: EditorGUILayout.HelpBox
样例:
示例代码:
1 2 3 EditorGUILayout.HelpBox("一般提示,你应该这样做..." , MessageType.Info); EditorGUILayout.HelpBox("警告提示,你可能需要这样做..." , MessageType.Warning); EditorGUILayout.HelpBox("错误提示,你不能这样做..." , MessageType.Error);
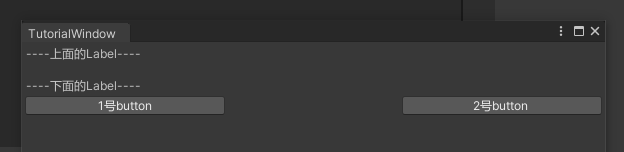
2. 间隔(Space) 关键字:EditorGUILayout.Space,GUILayout.FlexibleSpace
样例:
示例代码:
1 2 3 4 5 6 7 8 9 EditorGUILayout.LabelField("----上面的Label----" ); EditorGUILayout.Space(10 ); EditorGUILayout.LabelField("----下面的Label----" ); EditorGUILayout.BeginHorizontal(); GUILayout.Button("1号button" , GUILayout.Width(200 )); GUILayout.FlexibleSpace(); GUILayout.Button("2号button" , GUILayout.Width(200 )); EditorGUILayout.EndHorizontal();
3. GUILayout 派生控件 【EditorGUILayout 】本就是基于【GUILayout】进行的派生,用于 Editor GUI 的绘制,很多时候【http://EditorGUILayout.xxx() 】甚至完全可以用【http://GUILayout.xxx() 】代替。
当然,这两个类都有独自的一些控件,比如只有【GUILayout.Button】,只有【EditorGUILayout.Foldout】,有时候想要的控件在【EditorGUILayout】里找不到就去【GUILayout】里面找,反之亦然。
下面简单举例一些布局操作。
1
2
3
4
5
6
7
8
9
10
11
12
13
private Vector2 scrollRoot;... EditorGUILayout.BeginHorizontal(); EditorGUILayout.EndHorizontal(); EditorGUILayout.BeginVertical(); EditorGUILayout.EndVertical(); scrollRoot = EditorGUILayout.BeginScrollView(scrollRoot); EditorGUILayout.EndScrollView();
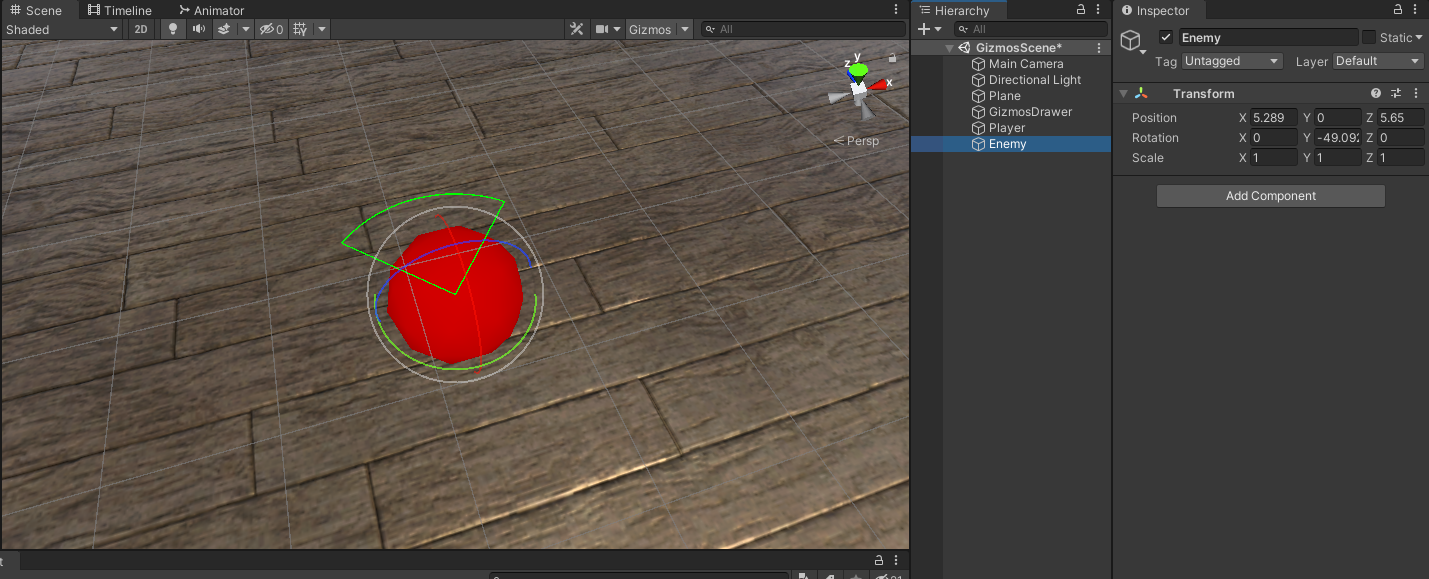
4 Gizmos 关键字 : Gizmos ,Monobehavior. OnDrawGizmos (), DrawLine,DrawRay,DrawSphere
这两者是在 Scene 视图下,进行图形绘制。
比如一个经典应用:画出 AI 敌人的视锥范围,就可以用 Gizmos. DraeRay 进行绘制,便于 Debug。
一、 Gizmos 基础介绍 官方文档: Important Classes - Gizmos & Handles
Important Classes - Gizmos & HandlesScene view and Game view, as well as interactive handles and controls. These two classes together provide a way for you to extend what is shown in these views and build interactive tools to edit your project in any way you like. For example, rather than entering numbers in the inspector , you could create a draggable circle radius gizmo around a non-player character in a game, which represents the area within which they can hear or see the player.Gizmos and Handles .Gizmos Handles
简单地说,Gizmos 与 Handles 主要用于开发编辑中,可视化一些数据信息,便于 Debug。
二、 Gizmos 使用方式 关键字: MonoBehaviour.OnDrawGizmos, MonoBehaviour.OnDrawGizmosSelected
Gizmos 能且只能在 MonoBehaviour 相关子类中,使用特定的函数调用,其中:
OnDrawGizmos() 在每帧调佣。所有在 OnDrawGizmos 中的渲染都是可见的。
OnDrawGizmosSelected() 仅在脚本附加的物体被选择时调用。
示例代码:
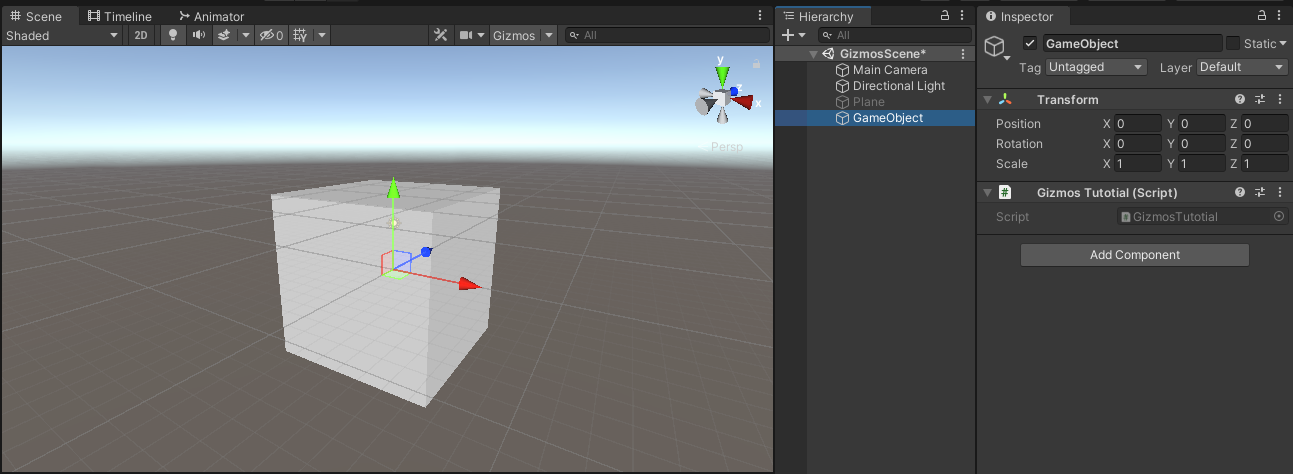
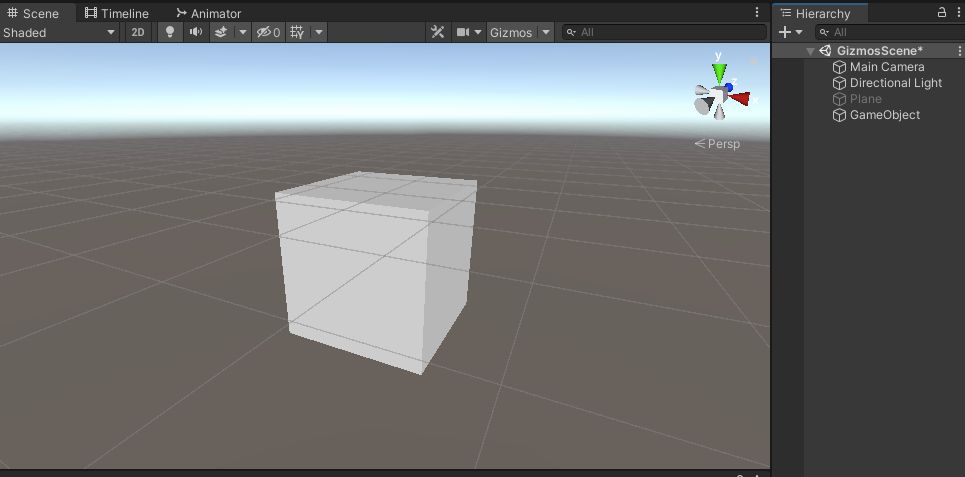
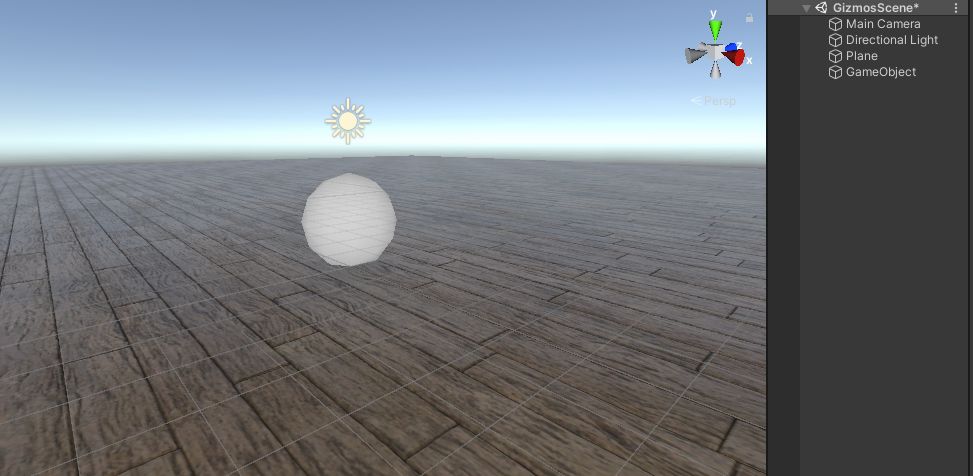
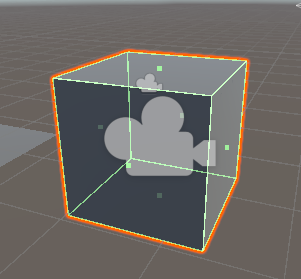
1
2
3
4
5
6
7
public class GizmosTutotial : MonoBehaviour { private Vector3 size = new Vector3(10 , 10 , 10 ); private void OnDrawGizmos () Gizmos.DrawCube (Vector3.zero, size ) ; } }
将此脚本挂载在场景中的 Gameobject 上,我们可以看见:
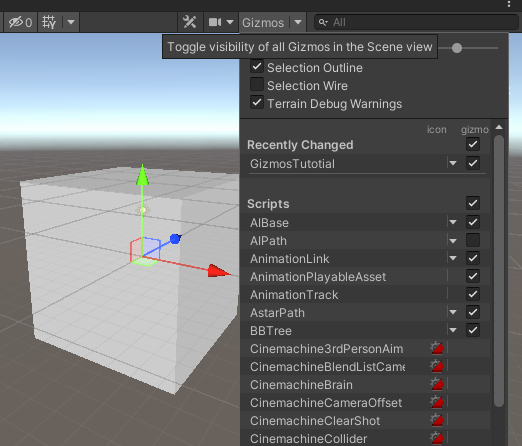
值得注意的是,场景上方工具栏的【Gizmos】开关定义了全局 “是否显示 Gizmos”,如果我们把此按钮取消激活,场景将不会绘制任何 Gizmos 图形。当然,点开小三角,能看见更详细的设置信息。
三、 Gizmos 基本绘制 API 注:本文不会对所有的 API 的全部定义进行讲解,一个方法实际存在多种重载,只介绍最基本最常用的方法;若想查看方法详细情况与重载,请自行在 Visual Studio 中 “转到定义”。
1. 立方体(Cube) 关键字: Gizmos.DrawCube
样例:
示例代码:
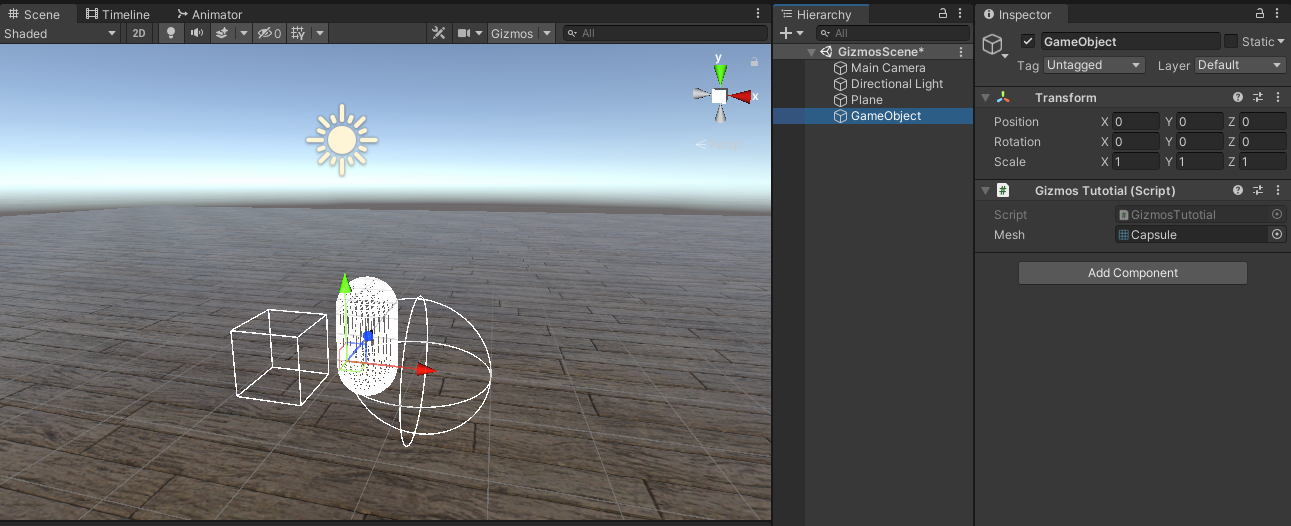
1
2
3
4
5
6
7
public class GizmosTutotial : MonoBehaviour { private void OnDrawGizmos () Gizmos.DrawCube(Vector3.zero, Vector3.one); } }
注:为了方便起见,下文将省略 Mono 类定义与 OnDrawGizmos 定义,请记得所有 Gizmos 方法都是在 OnDrawGizmos/OnDrawGizmosSelected 中使用。
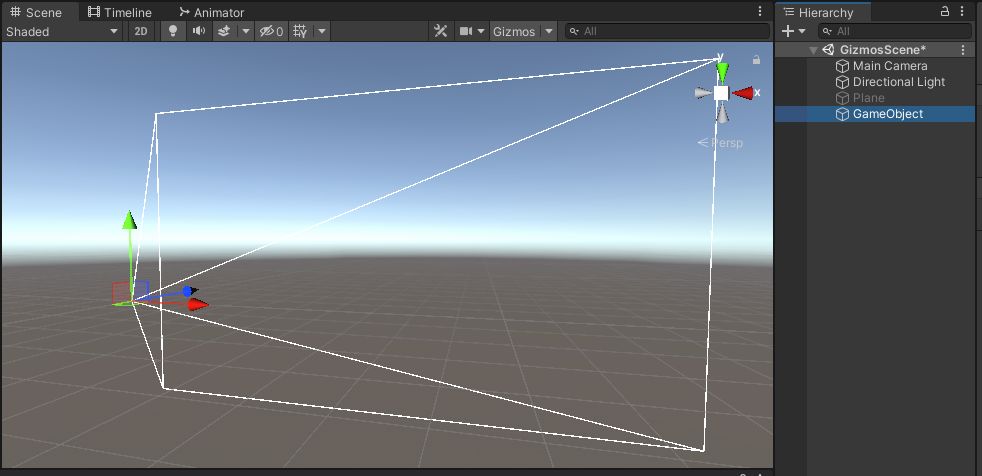
2. 视锥(Frustum) 关键字:Gizmos.DrawFrustum
样例:
示例代码:
1
2
Gizmos.DrawFrustum(Vector3.zero, 60 , 300 , 0.3f , 1.7f );
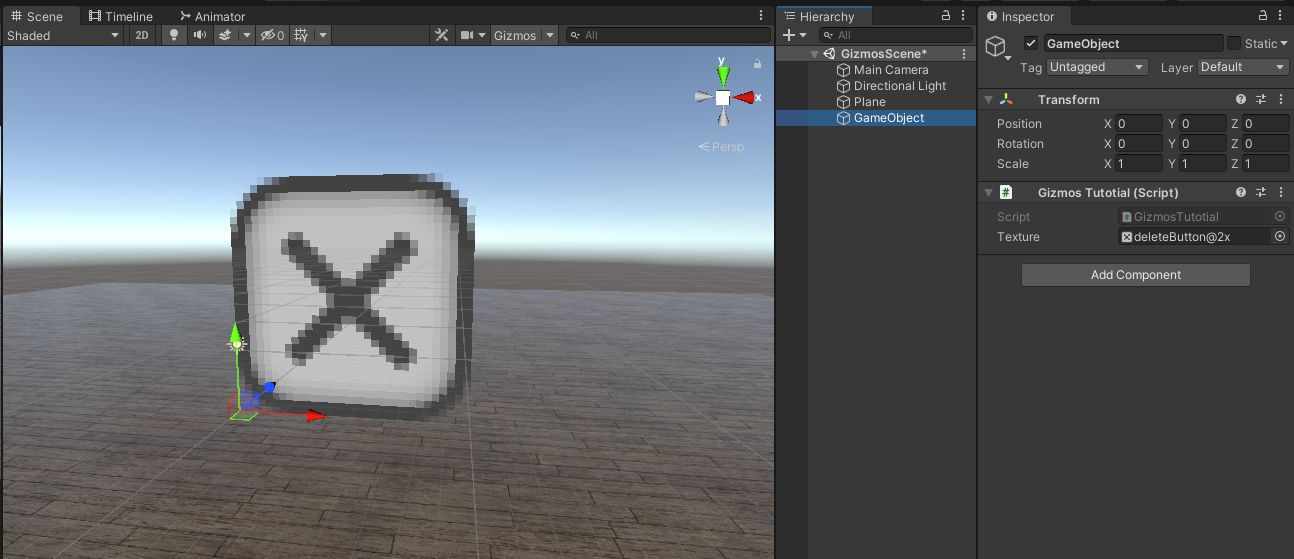
3. 贴图(Texture) 关键字:Gizmos.DrawGUITexture
样例:
示例代码:
1
2
3
4
5
6
public Texture texture;... if (texture != null ){ Gizmos.DrawGUITexture(new Rect(0 , 0 , 10 , 10 ), texture); }
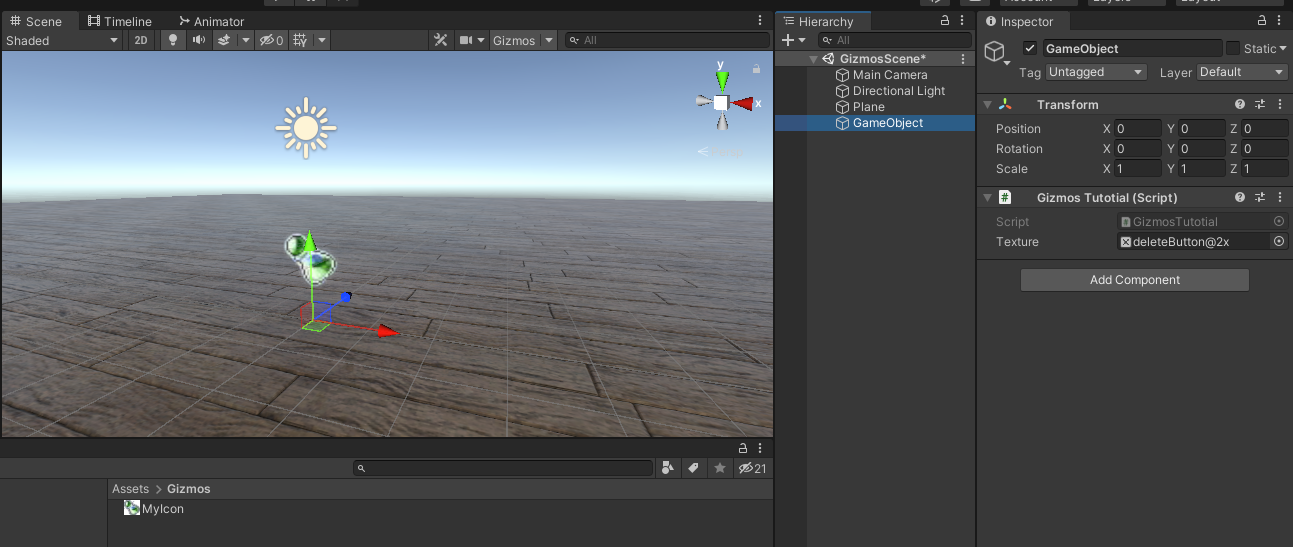
4. 图标(Icon) 关键字: Gizmos.DrawIcon
样例:
示例代码:
1 Gizmos.DrawIcon(Vector3.up, "MyIcon" );
注: 此处图标名 “MyIcon” 是指在路径:“Assets/Gizmos/…”中的图片名称。
DrawIcon 的前提是在资源文件夹 “Gizmos” 中存放想绘制的图片,定义好名称后,在代码中调用。
此处图片全路径为:“Assets/Gizmos/MyIcon.png”,所以写 “MyIcon”。
值得注意的是,所有在 Gizmos/Handles 中的绘制都不会发布到实际游戏中,只是在使用 Editor 开发时作为可视化辅助工具。
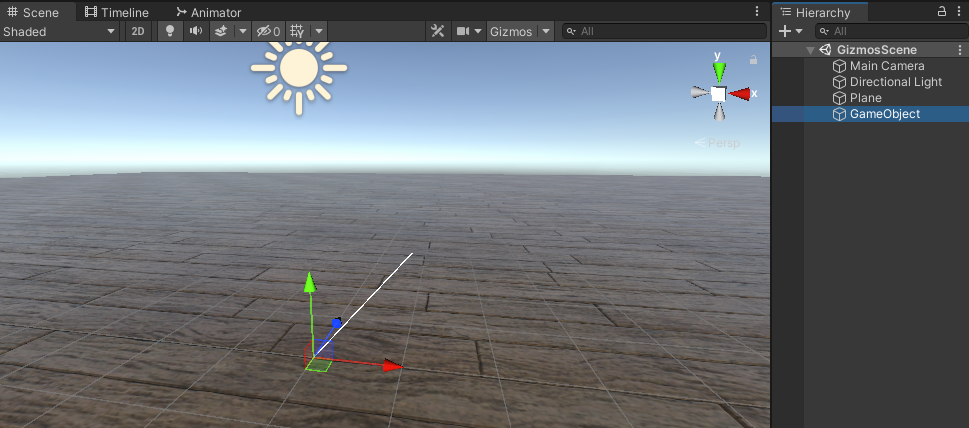
5. 线段(Line) 关键字: Gizmos.DrawLine
样例:
示例代码:
1 Gizmos.DrawLine(Vector3.zero, Vector3.one);
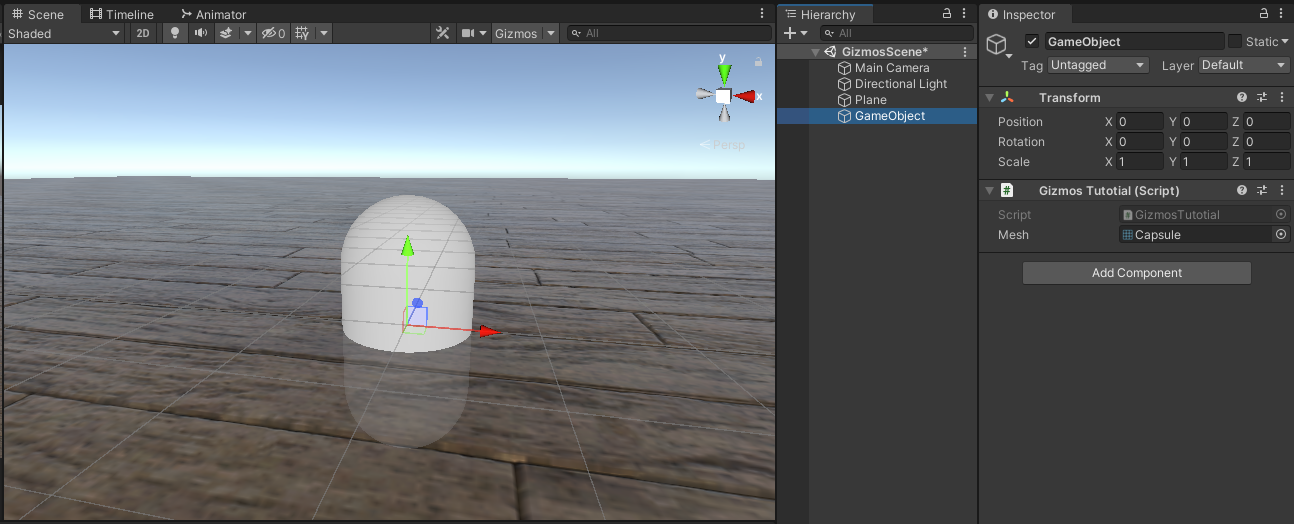
6. 网格(Mesh) 关键字:Gizmos.DrawMesh
样例:
示例代码:
1
2
3
4
5
6
public Mesh mesh;... if (mesh != null ){ Gizmos.DrawMesh(mesh, 0 ); }
7. 射线(Ray) 关键字:Gizmos.DrawRay
样例:
示例代码:
1 Gizmos.DrawRay(Vector3.zero, Vector3.one);
8. 球体(Sphere) 关键字:Gizmos.DrawSphere
样例:
示例代码:
1 Gizmos.DrawSphere(Vector3.up, 1 );
9. 网格线(Wire) 关键字:Gizmos.DrawWireCube
样例:
示例代码:
1
2
3
4
5
6
7
8
public Mesh mesh;... Gizmos.DrawWireCube(Vector3.left, Vector3.one); Gizmos.DrawWireSphere(Vector3.right, 1 ); if (mesh != null ){ Gizmos.DrawWireMesh(mesh, 0 , Vector3.forward); }
10. 颜色设置(Color) 关键字:Gizmos.Color
样例:
示例代码:
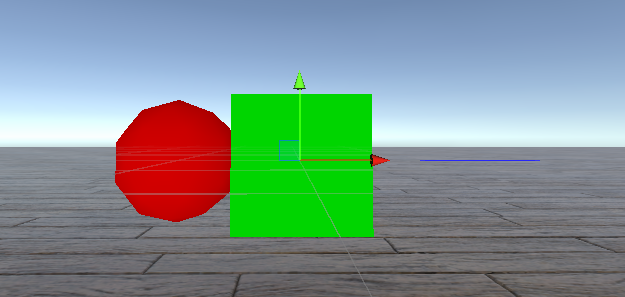
1
2
3
4
5
6
Gizmos.color = Color.red; Gizmos.DrawSphere(Vector3.left, 0.5f ); Gizmos.color = Color.green; Gizmos.DrawCube(Vector3.zero, Vector3.one); Gizmos.color = Color.blue; Gizmos.DrawLine(Vector3.right, Vector3.right * 2 );
11. 矩阵设置(Matrix) 关键字:Gizmos.matrix
样例:
示例代码:
1
2
Gizmos.matrix = this .transform.localToWorldMatrix; Gizmos.DrawWireSphere(Vector3.zero, 1 );
如果不对 Gizmos 的矩阵进行设置,默认为单位矩阵。
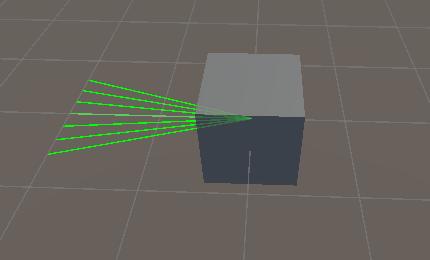
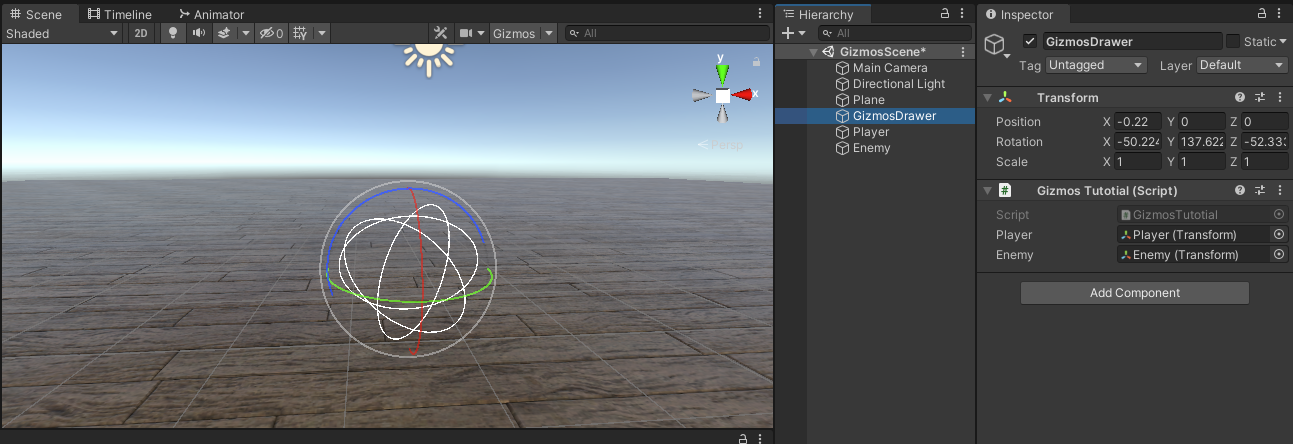
四、 Gizmos 经验使用 1. 绘制圆环(Circle) 由于 Gizmos 没有自带的圆环绘制 API,这里我们使用 DrawLine 自行计算圆环线段来实现圆环绘制。
样例:
示例代码:
1
2
3
4
5
6
7
8
9
10
11
12
13
14
15
16
17
18
19
20
21
22
23
24
25
26
27
28
29
30
31
32
33
public Transform player; public Transform enemy; ... if (player != null && enemy != null ){ Gizmos.color = Color.green; Gizmos.DrawSphere(player.position, 0.5f ); Gizmos.color = Color.red; Gizmos.DrawSphere(enemy.position, 0.5f ); Gizmos.color = Color.yellow; Gizmos.DrawLine(player.position, enemy.position); DrawCircle(enemy, 3 , 0.1f , Color.red); DrawCircle(enemy, 5 , 0.1f , Color.green); } private void DrawCircle (Transform transform, float radius, float theta, Color color ){ var matrix = Gizmos.matrix; Gizmos.matrix = transform.localToWorldMatrix; Gizmos.color = color; Vector3 beginPoint = new Vector3(radius, 0 , 0 ); Vector3 firstPoint = new Vector3(radius, 0 , 0 ); for (float t = 0 ; t < 2 * Mathf.PI; t += theta) { float x = radius * Mathf.Cos(t); float z = radius * Mathf.Sin(t); Vector3 endPoint = new Vector3(x, 0 , z); Gizmos.DrawLine(beginPoint, endPoint); beginPoint = endPoint; } Gizmos.DrawLine(firstPoint, beginPoint); Gizmos.matrix = matrix; }
2. 绘制弧线(Arc) 样例:
示例代码:
1
2
3
4
5
6
7
8
9
10
11
12
13
14
15
16
17
18
19
20
21
22
23
24
25
public Transform enemy;... Gizmos.color = Color.red; Gizmos.DrawSphere(enemy.position, 0.5f ); DrawArc(enemy, 1 , 90 , 0.1f , Color.green); ... private void DrawArc (Transform transform, float radius, float angle, float theta, Color color ){ var matrix = Gizmos.matrix; Gizmos.matrix = transform.localToWorldMatrix; Gizmos.color = color; Vector3 beginPoint = Vector3.zero; Vector3 firstPoint = Vector3.zero; var rad = Mathf.Deg2Rad * angle; for (float t = 0 ; t < rad; t += theta) { float x = radius * Mathf.Cos(t); float z = radius * Mathf.Sin(t); Vector3 endPoint = new Vector3(x, 0 , z); Gizmos.DrawLine(beginPoint, endPoint); beginPoint = endPoint; } Gizmos.DrawLine(firstPoint, beginPoint); Gizmos.matrix = matrix; }
值得注意的是,这种弧线的绘制算法,以单位圆为例,起点是从局部坐标(1,0,0)开始,也就是相对于 forward 的 right 方向,90 度弧线实际扫过的面积是从 right(1,0,0) 到 forward(0,0,1) 的面积。
所以这种算法不适用于 AI 视锥感知范围的绘制(90 度视觉范围应该是相对于 forward 方向的左右各 45 度)。
如何修改,那就是简单的数学题了,就待读者自行计算了。
五、小结 Gizmos 提供了基本的图形绘制,而场景文本(Text)绘制则是由 UnityEditor.Handles.Label 提供,我们将在后续介绍中对 Handles 进行说明。
5 Handles 关键字 :SceneView, 3D GUI ,Editor.OnSceneGUI() , 3D Label
主要是在 Scene View 下,用于显示 / 控制物体的某些属性,便于 Debug 查看。
比如 Collider (碰撞盒) 的绿色线框就属于 Handles 的处理。
一、 Handles 基础介绍 Handles
一言以蔽之,许多需要在场景中程序化生成的数据,使用 Handles 类能轻松地显示控制柄来进行编辑,典型使用就是 “地编”。
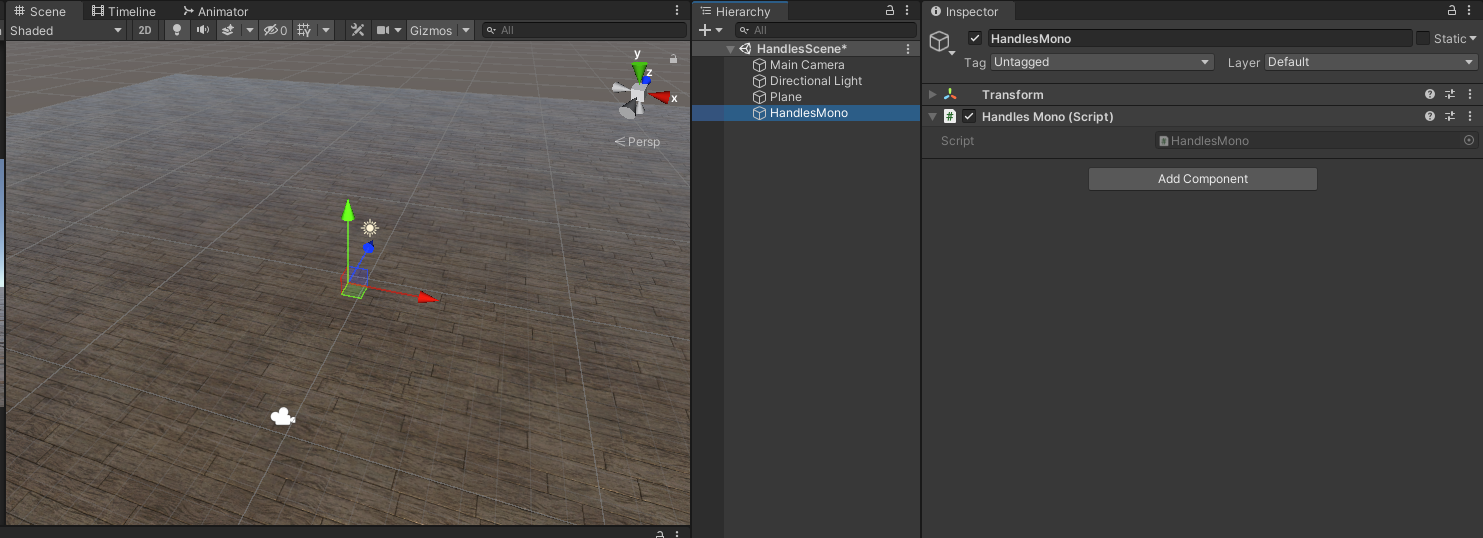
二、 Handles 使用方式 1. 基于 Editor 类的 OnSceneGUI 在继承自 Editor 的类中,可以定义【OnSceneGUI()】
这样当此 Edtior 在活跃状态时(比如一个 Inspector 面板展开),在【OnSceneGUI()】方法内的内容将根据 SceneView 的刷新而调用,触发对应逻辑。
比如进行基本定义:
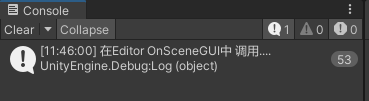
1
2
3
4
5
6
7
8
9
10
11
12
13
14
15
16
17
18
------HandlesMono .cs------ using UnityEngine;public class HandlesMono : MonoBehaviour { } ------HandlesMonoEditor.cs------ using UnityEngine;using UnityEditor;[CustomEditor(typeof(HandlesMono)) ] public class HandlesMonoEditor : Editor { private void OnSceneGUI () { Debug.Log("在Editor OnSceneGUI中 调用...." ); } }
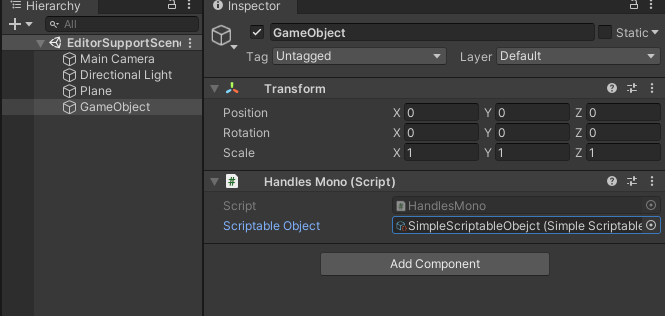
在【Hierarchy】中新建空对象,挂载脚本,点击对象在【Inspector】中显示【HandlesMono】信息,就可以看见信息打印:
当然,如果在【Hierarchy】中不选择对应物体,则【HandlesMono】不在检视器中显示,意味着【HandlesMono】 Disable 掉了,将不会调用【OnSceneGUI】,读者可自行尝试。
(Tips:如果想要它一直调用,但是又需要选择其他对象怎么办呢?可以点击【Inspector】右侧的【锁】按钮,加锁之后只会显示当前的【Inspector】信息,不会随着选择而更改。)
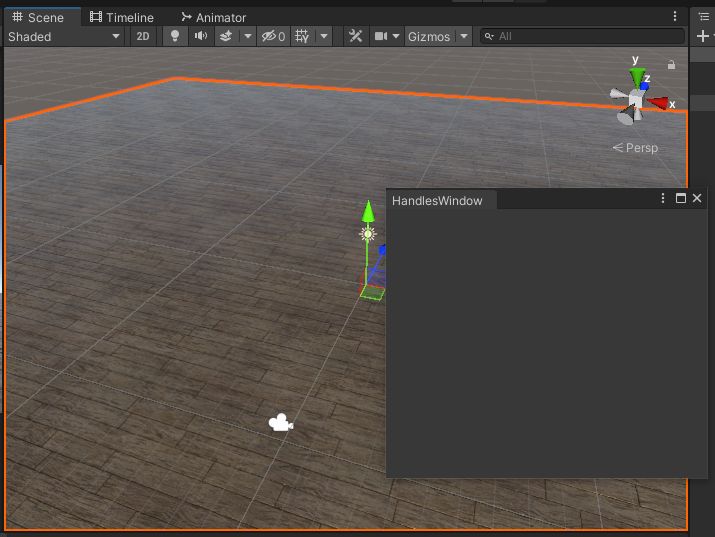
2. 基于 EditorWindow 的手动注册 有些时候,我们更想在一个 Window 中进行数据编辑与操作,但是 EditorWindow 可没有 OnSceneGUI,怎么办呢?这时候,需要手动对 SceneView 的刷新事件进行注册了。
比如:
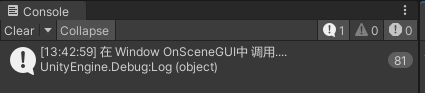
1
2
3
4
5
6
7
8
9
10
11
12
13
14
15
16
17
18
19
20
21
22
23
24
25
using UnityEngine; using UnityEditor; public class HandlesWindow : EditorWindow { public static HandlesWindow m_mainWindow; [MenuItem("MyWindows/HandlesWindow")] public static void OpenWindow() //打开窗口 { m_mainWindow = EditorWindow.GetWindow<HandlesWindow>(); m_mainWindow.Show(); } private void OnEnable() { SceneView.duringSceneGui += OnSceneGUI; //对SceneView的刷新事件进行注册 } private void OnDisable() { SceneView.duringSceneGui -= OnSceneGUI; //对SceneView的刷新事件取消注册 } private void OnSceneGUI(SceneView sceneView) //自定义刷新事件的委托方法 { Debug.Log("在 Window OnSceneGUI中 调用...."); //具体逻辑 } }
注:下文实例代码都是在 EditorWindow 中编写调用。
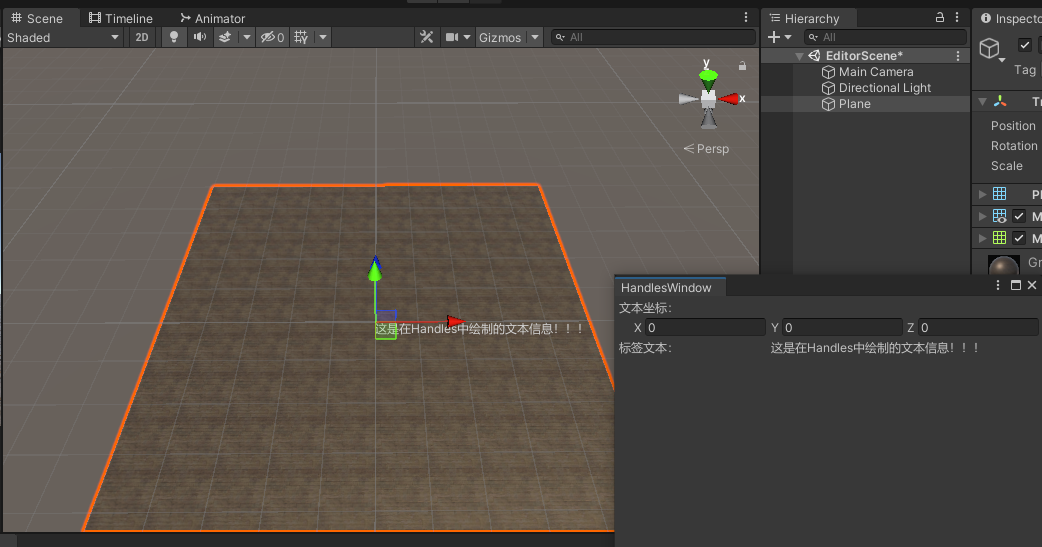
三、 Handles 基本绘制方法 1. Label(文本) 关键字: Handles.Label
样例:
示例代码:
1
2
3
4
5
6
private Vector3 labelPos = Vector3.zero; private string labelText = "这是在Handles中绘制的文本信息!!!"; ... //Window GUI 绘制(使用EditorGUILayout) ... Handles.Label(labelPos, labelText); // 绘制Label
注:EditorWindow 的绘制只是为了显示信息方便,Editor 绘制方式见:Unity Editor 编辑器扩展功能详解(3)
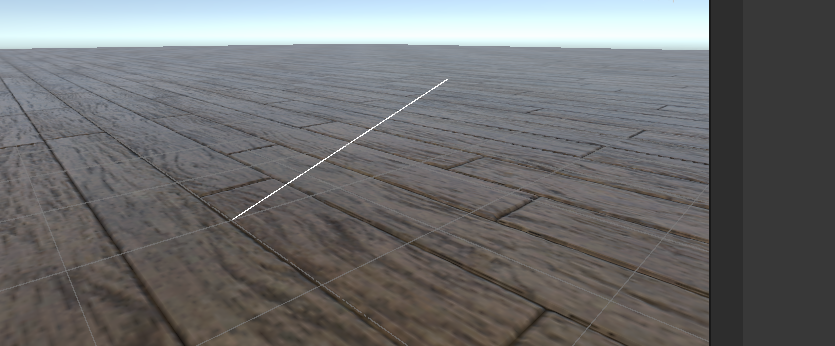
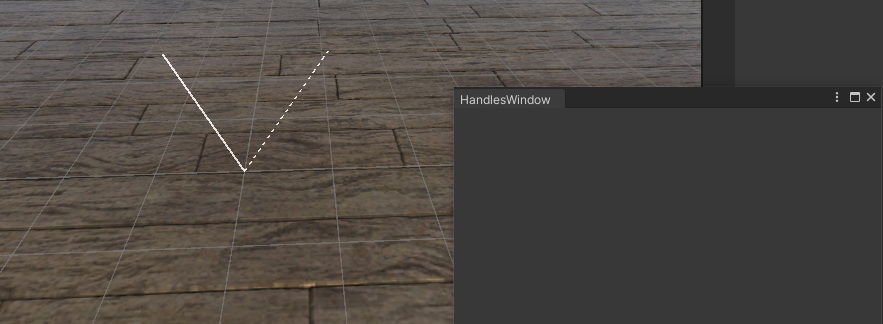
2. Line/Dotted Line(线段 / 虚线) 关键字: Handles.DrawLine,Handles.DrawDottedLine
样例:
示例代码:
1
2
3
4
//1.from 2.to 3.thickness(厚度)决定线段厚度 Handles.DrawLine(Vector3.zero, new Vector3(-1, 1, 1), 2f); //1.from 2.to 3.ScreenSpaceSize(屏幕空间大小)决定虚线长度 Handles.DrawDottedLine(Vector3.zero, Vector3.one, 2f);
3. Arc/Disc(弧线 / 圆环) 关键字:Handles.DrawWireArc,Handles.DrawSolidDisc
样例:
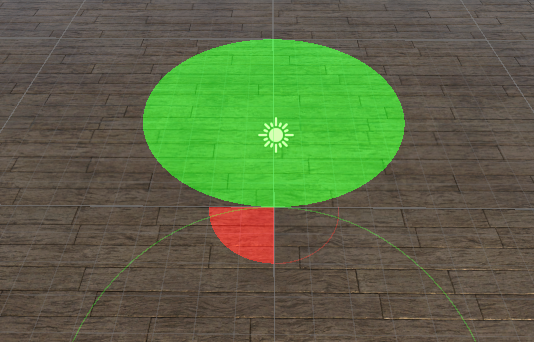
示例代码:
1
2
3
4
5
6
7
Handles.color = new Color(1, 0, 0, 0.3f); //提前使用Color进行颜色设置,便于观察 Handles.DrawWireArc(Vector3.zero, Vector3.up, Vector3.right, 90, 2); //绘制线框弧线 Handles.DrawSolidArc(Vector3.zero, Vector3.up, Vector3.back, 90, 2); // 绘制填充弧线 Handles.color = new Color(0, 1, 0, 0.3f); Handles.DrawSolidDisc(new Vector3(0, 0, 5), Vector3.up, 5); //绘制填充圆环 Handles.DrawWireDisc(new Vector3(0, 0, -5), Vector3.up, 5); //绘制线框圆环
4. Rectangle(矩形) 关键字:Handles.DrawSolidRectangleWithOutline
样例:
示例代码:
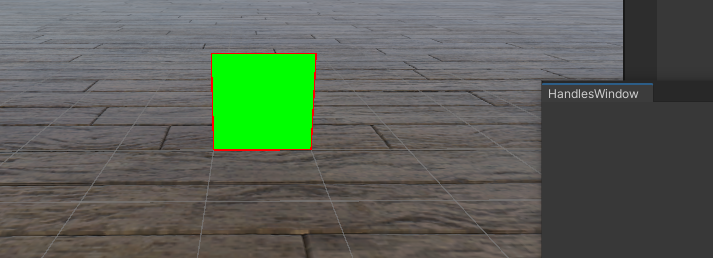
1 Handles.DrawSolidRectangleWithOutline(new Rect(0, 0, 1, 1), Color.green, Color.red);
5. GUI 关键字:Handles.BeginGUI(),Handles.EndGUI()
样例:
示例代码:
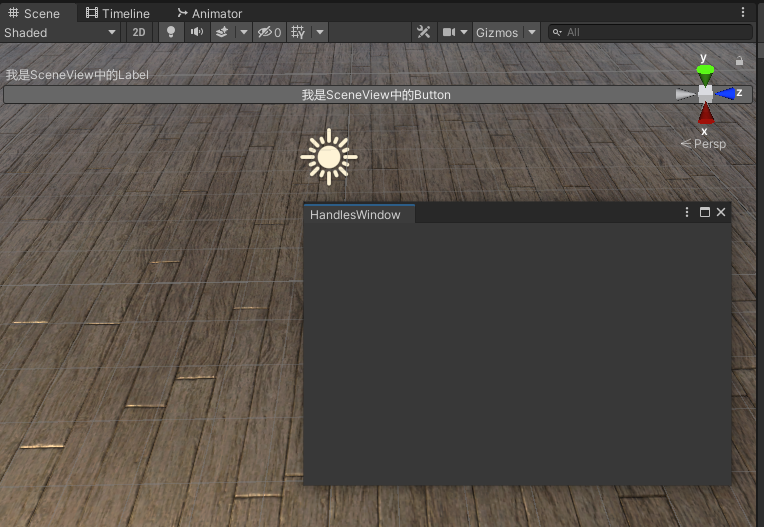
1
2
3
4
5
6
7
Handles.BeginGUI(); GUILayout.Label("我是SceneView中的Label"); if (GUILayout.Button("我是SceneView中的Button")) { Debug.Log("芜湖"); } Handles.EndGUI();
四、 控制柄 实际上,Handles 核心功能是他的 Handle(控制)类,比如:Handles.PositionHandle 就是一个类似于 Position 移动的方法。经典使用例就是在一个 List<Vector3> 列表中,选择某个列表元素显示他的 Position 控制柄,然后进行移动。
又或者类似这种:
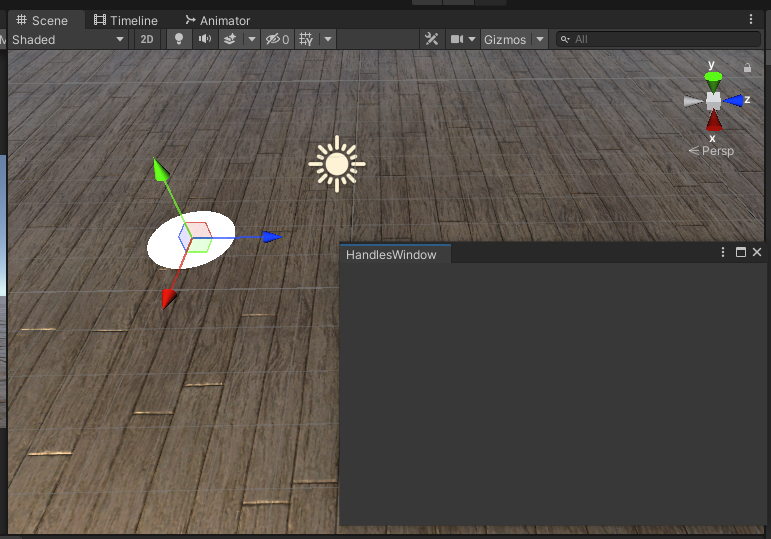
1
2
3
4
private Vector3 root = Vector3.zero; ... Handles.DrawSolidDisc(root, Vector3.up, 1); //画个圆,假设这是目标对象 root = Handles.PositionHandle(root, Quaternion.identity); //控制柄
但是笔者现阶段使用的较少,不是很熟悉,就不作解释了。
详情可见:Unity 的 Handles 类_林新发的博客 - CSDN 博客_unity 里 handle
或者看看官方 API 文档 。
或者是 Unity 编辑器扩展五 Handles 扩展 Scene 视图
笔者摸了。_(:з」∠)_
五、 小结 实际上,OnGUIScene + Handles 还有一种应用就是 “地形笔刷”,就像 Terrain 笔刷那样在 SceneView 里面刷刷刷调整高度、生成植被,这种功能我们也是能自己写一套的,核心是编辑模式下的 Event 事件。
具体的可见:Unity - Scripting API: Event
有空再写,大概(
6 Editor 常用辅助类 本节主要介绍在编辑器扩展中,经常打交道的几个编辑器类的常用方法,他们几乎只会在 Editor 模式下使用,不会在 Runtime 使用。
常见的有:ScriptableObject, EditorUtility,AssetDatabase,Selection,Event 等。
关键字 :EditorUtility, AssetDatabase, Selection, 序列化对象修改 / 保存,资源读取 / 保存
EditorUtility : unity 内置的关于 editor 使用的一些工具类,用的最多的应该是:
1
2
EditorUtility.SetDirty(Object obj); AssetDatabase.SaveAssets();
AssetDatabase : 在编辑器模式下,对项目资源的管理。类似:
1
2
public static T LoadAssetAtPath <T >(string assetPathpublic static string GetAssetPath (UnityEngine.Object assetObject )
Selection : 含有当前选择的资源文件 / 文件夹的各种信息。
一个应用就是通过代码检索资源,然后选择目标资源,Inspector 就自动显示了目标资源文件信息。使用类似于
1 Selection.activeObject = obj;
一、ScriptableObject 1. 简介与定义 这里初略介绍一下【ScriptableObject】,我们可以把他理解为一种存储于【硬盘】而不是【内存】上的 Config 资产文件。
就像一张 Excel 表一样,在一个【ScriptableObject】中配置的数据是持久化保存的。
简单案例:
1 2 3 4 5 6 7 8 9 10 11 12 13 14 15 [CreateAssetMenu(menuName = "MyConfig/SimpleObj" , fileName = "SimpleScriptableObejct" ) ] public class SimpleScriptableObject : ScriptableObject { [SerializeField ] public List<InfoPair> pairs; } [System.Serializable ] public class InfoPair { public int someID; public string someName; public Texture someTex; }
在【Project】视图中,右键打开菜单,即可创建我们自定义的文件:
2. 基本使用 在使用时,可以在一个 Mono 文件里面定义字段:
1
2
3
4
5
6
7
8
9
10
11
12
13
public SimpleScriptableObject scriptableObject; private void Start () { if (scriptableObject != null ) { if (scriptableObject.pairs != null && scriptableObject.pairs.Count > 0 ) { var name = scriptableObject.pairs[0 ].someName; Debug.Log($"SO element name : {name} " ); } } }
基本上,所有的【配置数据】都可以用【ScriptableObject】保存(当然你也可以选择直接序列化为 bytes 文件,或者 json 文件等等,但是没有 unity 原生支持的 ScriptableObject 直观,而且可以直接在 Inspector 中修改数据)。
3. Tip 值得注意的是,我们选中一个【ScriptableObject】时,在【Inspector】是有显示 GUI 的,这意味着我们也可以自定义【ScriptableObject】的【Editor】,方法就跟自定义一个【MonoBehaviour】的【Editor】一样。
同时,手动在【ScriptableObject】面板中写入数据也不是我们想要的,更多是使用代码对其进行数据填充(比如读取一张 Excel 的数据转换成【ScriptableObject】保存形式)
4. 保存方式(重要) 但是!重点来了,我们在【Inspector】中的数据填充操作,编辑器是自动标识 “脏数据” 且刷新保存的,如果使用【代码填充】数据,切记使用以下方法进行保存!否则数据将不会保存!
1 2 3 EditorUtility.SetDirty(simpleScriptableObject); AssetDatabase.SaveAssets();
5. 使用代码创建 ScriptableObject 1 2 3 4 5 6 var simpleScriptableObject = ScriptableObject.CreateInstance<SimpleScriptableObject>();AssetDatabase.CreateAsset(simpleScriptableObject, "Assets/SomePath/simpleSO.asset" );
二、EditorUtility Utility:有用的,多功能的;
1. 脏标记 1 EditorUtility.SetDirty(someObject);
2. 提示框 关键字: EditorUtility.DisplayDialog
1 2 var flag = EditorUtility.DisplayDialog("标题" , "显示消息" , "确认键" );
3. 进度条 关键字:EditorUtility.DisplayProgressBar,EditorUtility.ClearProgressBar
1 2 3 4 5 6 7 8 9 10 11 12 13 14 private float value ; private void OnGUI () { if (GUILayout.Button("增加进度" )) { value += 0.1f ; value = Mathf.Clamp01(value ); } EditorUtility.DisplayProgressBar("进度条" , "显示信息" , value ); if (value == 1 ) { EditorUtility.ClearProgressBar(); } }
当然还有其他许多 API,有兴趣请自行查看。
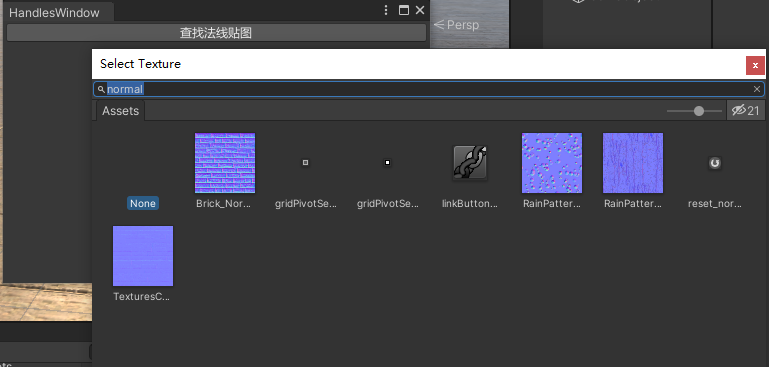
三、EditorGUIUtility 1. 搜索框(ObjectPicker) 关键字:EditorGUIUtility.ShowObjectPicker
1 2 3 4 5 6 7 8 9 10 11 private Texture tex;... if (GUILayout.Button("查找法线贴图" )){ EditorGUIUtility.ShowObjectPicker<Texture>(tex, false , "normal" , 0 ); }
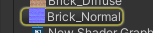
2. 选中提示 关键字: EditorGUIUtility.PingObject
1 EditorGUIUtility.PingObject(someObj);
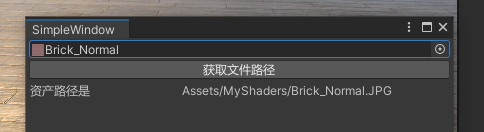
四、AssetDatabase 1. 获取资产路径 关键字:AssetDatabase.GetAssetPath
1 2 3 4 5 6 7 8 9 private Texture tex;private string path;... tex = EditorGUILayout.ObjectField(tex, typeof (Texture), false ) as Texture; if (GUILayout.Button("获取文件路径" )){ path = AssetDatabase.GetAssetPath(tex); } EditorGUILayout.LabelField("资产路径是" , path);
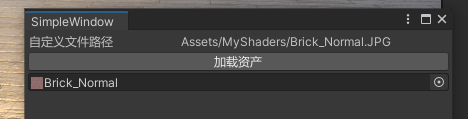
2. 加载资产 关键字: AssetDatabase.LoadAssetAtPath
1 2 3 4 5 6 7 8 9 private string texPath = "Assets/MyShaders/Brick_Normal.JPG" ; private Texture myTex; ... EditorGUILayout.LabelField("自定义文件路径" , texPath); if (GUILayout.Button("加载资产" )){ myTex = AssetDatabase.LoadAssetAtPath<Texture>(texPath); } EditorGUILayout.ObjectField(myTex, typeof (Texture), false );
3. 创建资产 关键字:AssetDatabase.CreateAsset
详见上文: 5. 使用代码创建 ScriptableObject
实际上,【AssetDatabase】几乎涵盖了所有关于资产文件的 CRUD(增删改查)方法,其 API 的使用方式也是顾名思义,更多的请自行查阅。
五、Selection Selection 主要是用于返回在编辑器中的选择对象(Object)信息 ,这个对象(Object)可以是一份资产文件(Asset、Prefab),也可是场景中的实例对象(Gameobject)。
一个经典应用就是,比如在 EditorWindow 中实例化了一个对象,出于操作友好性,应该把当前选择对象直接变为生成实例,这样在【Inspector】面板中就能显示对应信息了,这种操作就是通过 Selection 类实现的。
(注:Selection 在命名空间 UnityEditor 中定义)
1. Object Selection (对象选择) 1 2 3 4 5 6 7 8 9 Selection.activeGameObejct Selection.activeTransform Selection.activeObject Selection.gameObjects Selection.objects Selection.transforms Selection.selectionChanged
2. Static Methods (静态方法) 1 2 3 4 5 6 7 8 9 10 11 public static bool Selection.Contains(int instanceID) public static bool Selection.Contains(Object obj)public static T[] GetFiltered <T >(SelectionMode mode )public static Transform[] GetTransforms (SelectionMode mode )
3. SelectionMode 详解 1 2 3 4 5 6 7 Unfiltered 返回整个选择(无模式过滤) TopLevel 只返回最上层transform, 子物体的transform将被过滤掉 Deep 返回选择对象与他所有的子对象 ExcludePrefab 排除选择中的prefab对象 Editable 排除任何无法被修改的对象(只选择可以编辑的对象) Assets 返回Asset资源 DeepAssets 返回整个文件夹内容(根目录与子文件夹)
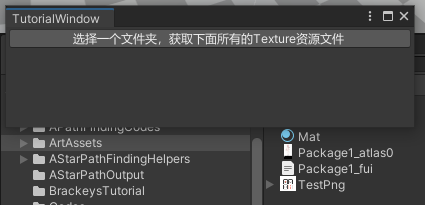
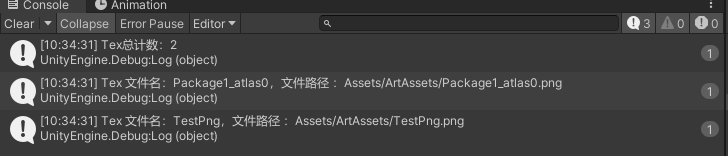
4. 示例案例 目的:获取某个文件夹下所有的 Texture 资产
示例代码:
1 2 3 4 5 6 7 8 9 10 11 12 13 private void OnGUI () { if (GUILayout.Button("选择一个文件夹,获取下面所有的Texture资源文件" )) { var texs = Selection.GetFiltered<Texture>(SelectionMode.DeepAssets); Debug.Log($"Tex总计数:{texs.Length} " ); foreach (var tex in texs) { Debug.Log($"Tex 文件名:{tex.name} ,文件路径 :{AssetDatabase.GetAssetPath(tex)} " ); } } }
目的:新建一个 GameObject,同时选中
示例代码:
1 2 3 4 5 6 if (GUILayout.Button("创建一个 Cube,同时选中" )){ var obj = GameObject.CreatePrimitive(PrimitiveType.Cube); obj.name = "新建的Cube" ; Selection.activeGameObject = obj; }
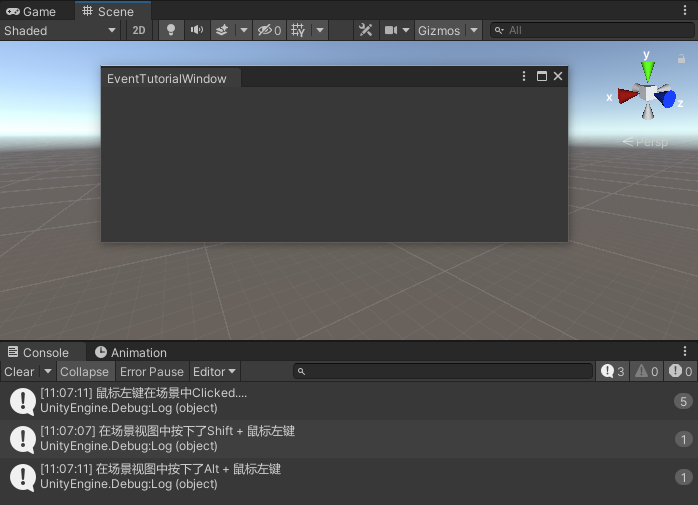
六、 Event Event 主要用于编辑器模式下,对 IMGUI 操作输入的响应。
在 Editor 模式(而不是 Playing 模式)下,写在代码中的类似【Input. GetKeyDown】是无效的,是无法获取键盘 / 鼠标操作信息的,取而代之的是使用类似【Event. current. type == EventType. MouseDown】检测输入。
它的使用可以在 Editor 的面板下,也可以在场景视图中(SceneView)。
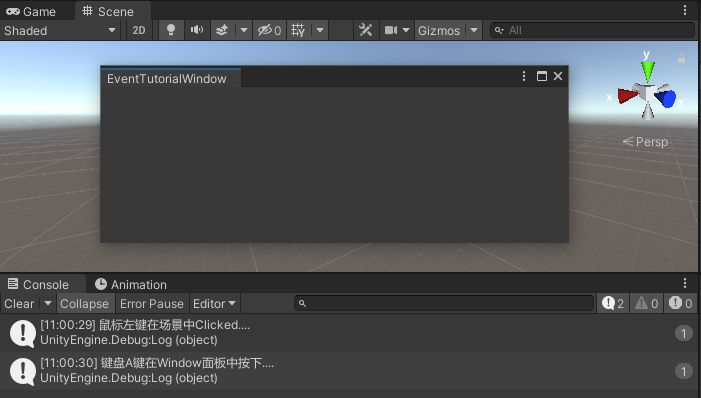
1. 简单输入
示例代码:
1 2 3 4 5 6 7 8 9 10 11 12 13 14 15 16 17 18 19 20 21 22 23 24 25 26 27 28 29 30 31 32 33 34 35 36 37 38 39 40 41 42 43 44 45 46 public class EventTutorialWindow : EditorWindow { public static EventTutorialWindow m_mainWindow; [MenuItem ("MyWindows/EventWindow" ) ] public static void OpenWindow () { m_mainWindow = EditorWindow.GetWindow<EventTutorialWindow>(); m_mainWindow.Show(); } private void OnEnable () { SceneView.duringSceneGui += OnSceneView; } private void OnDisable () { SceneView.duringSceneGui -= OnSceneView; } private void OnSceneView (SceneView sceneView ) { if (Event.current.type == EventType.MouseDown && Event.current.button == 0 ) { Debug.Log("鼠标左键在场景中Clicked...." ); } } private void OnGUI () { if (Event.current.type == EventType.KeyDown && Event.current.keyCode == KeyCode.A) { Debug.Log("键盘A键在Window面板中按下...." ); } } }
2. 组合键
示例代码:
1 2 3 4 5 6 7 8 9 10 11 12 ... if (Event.current.type == EventType.MouseDown && Event.current.button == 0 ){ if (Event.current.alt) { Debug.Log("在场景视图中按下了Alt + 鼠标左键" ); } else if (Event.current.shift) { Debug.Log("在场景视图中按下了Shift + 鼠标左键" ); } }
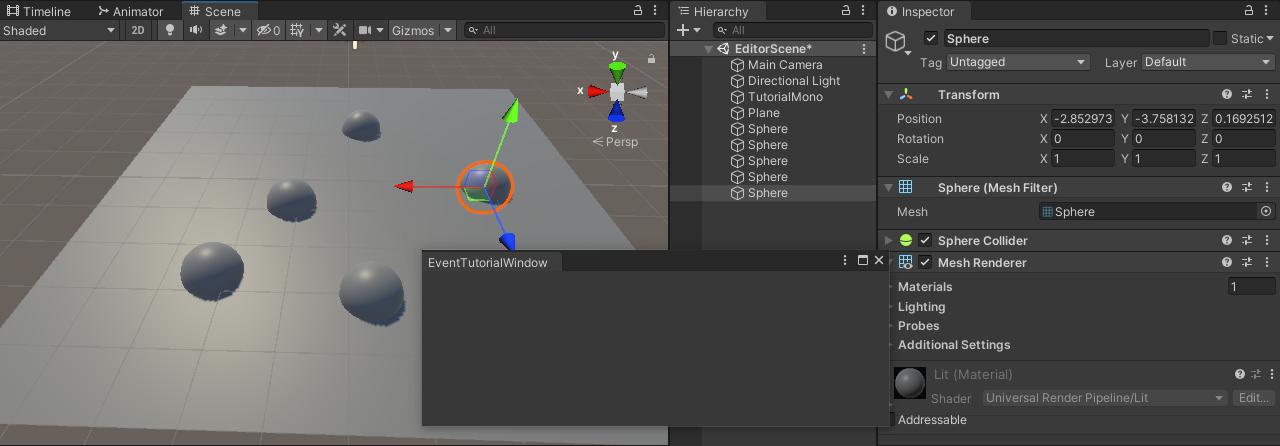
3. 坐标转换 一个很常见的需求就是,我们在 SceneView 中点击了,希望在点击处发射一条射线检测场景中的物体,求一个交点然后放置什么东西(就像 Terrain 的笔刷一样),这是通过以下方式实现的。
1 2 3 4 5 6 7 8 9 10 11 12 13 14 15 16 private LayerMask layerMask = -1 ; ... private void OnSceneView (SceneView sceneView ){ if (Event.current.type == EventType.MouseDown && Event.current.button == 0 ) { var mousePos = Event.current.mousePosition; var ray = HandleUtility.GUIPointToWorldRay(mousePos); RaycastHit hit; if (Physics.Raycast(ray, out hit, float .MaxValue, layerMask)) { var obj = GameObject.CreatePrimitive (PrimitiveType. Sphere); obj.transform.position = hit.point; } } }
样例:
4. Tip 查阅资料的时候发现有这样一种使用方法:
文档解释:Unity - Scripting API: Event.Use
文档上说,在某些 Event 检测后,使用 Event.current.Use (); 就能让其他 GUI elements 忽视这次 Event。
比如说使用 Alt + 鼠标左键创建物体,但是这个组合键也是 unity 场景自带的组合键,用于旋转 SceneView 的,使用
Event.current.Use (); 就会让自带的旋转功能失效。
主要是为了解决组合键冲突吧。
七、小结 这些玩意儿纯粹是【经验性质】的使用方法,基本没啥技术含量,多读读 API 文档就好了,比如:
AssetDatabase 的方法总结_Real_JumpChen 的博客 - CSDN 博客
7 Editor 美化 本节介绍一些常用的编辑器面板美化方法,牵涉【GUIStyle、GUISkin】,你可以理解为这两者是 Unity 内置的 GUI 绘制约束与模板。
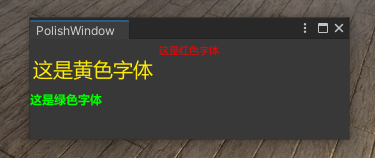
一、字体格式 / 颜色 关键字:GUIStyle
样例:
示例代码:
1 2 3 4 5 6 7 8 9 10 11 12 13 14 15 16 17 18 19 20 21 22 23 24 25 26 27 28 29 30 31 32 33 34 35 using UnityEditor;using UnityEngine;public class PolishWindow : EditorWindow { public static PolishWindow m_mainWindow; private GUIStyle defaultStyle = new GUIStyle(); [MenuItem("MyWindows/PolishWindow" ) ] public static void OpenWindow () { m_mainWindow = EditorWindow.GetWindow<PolishWindow>(); m_mainWindow.Show(); } private void OnGUI () { defaultStyle.fontSize = 10 ; defaultStyle.fontStyle = FontStyle.Normal; defaultStyle.alignment = TextAnchor.MiddleCenter; defaultStyle.normal.textColor = Color.red; EditorGUILayout.LabelField("这是红色字体" , defaultStyle); defaultStyle.alignment = TextAnchor.MiddleLeft; defaultStyle.normal.textColor = Color.yellow; defaultStyle.fontSize = 20 ; EditorGUILayout.LabelField("这是黄色字体" , defaultStyle); defaultStyle.normal.textColor = Color.green; defaultStyle.fontSize = 12 ; defaultStyle.fontStyle = FontStyle.Bold; EditorGUILayout.SelectableLabel("这是绿色字体" , defaultStyle); } }
注:下文代码将只给出关键代码,实际使用位置如上所示在 OnGUI() 方法中。
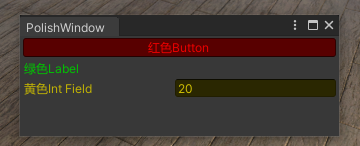
二、GUI 颜色 关键字:GUI.color
样例:
示例代码:
1 2 3 4 5 6 GUI.color = Color.red; GUILayout.Button("红色Button" ); GUI.color = Color.green; EditorGUILayout.LabelField("绿色Label" ); GUI.color = Color.yellow; EditorGUILayout.IntField("黄色Int Field" , 20 );
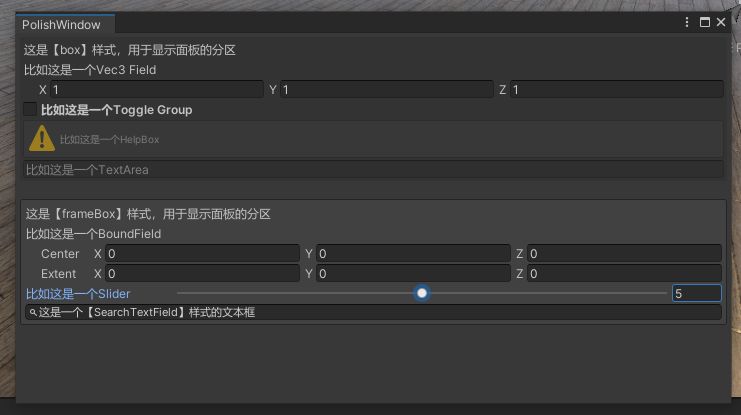
三、面板分区 / 搜索框 关键字:
样例:
示例代码:
1 2 3 4 5 6 7 8 9 10 11 12 13 14 15 16 17 EditorGUILayout.BeginVertical("box" ); EditorGUILayout.LabelField("这是【box】样式,用于显示面板的分区" ); EditorGUILayout.Vector3Field("比如这是一个Vec3 Field" , Vector3.one); EditorGUILayout.BeginToggleGroup("比如这是一个Toggle Group" , false ); EditorGUILayout.HelpBox("比如这是一个HelpBox" , MessageType.Warning); EditorGUILayout.TextArea("比如这是一个TextArea" ); EditorGUILayout.EndToggleGroup(); EditorGUILayout.EndVertical(); EditorGUILayout.Space(10 ); EditorGUILayout.BeginVertical("frameBox" ); EditorGUILayout.LabelField("这是【frameBox】样式,用于显示面板的分区" ); EditorGUILayout.BoundsField("比如这是一个BoundField" , new Bounds()); EditorGUILayout.Slider("比如这是一个Slider" , 5 , 0 , 10 ); EditorGUILayout.TextArea("这是一个【SearchTextField】样式的文本框" , "SearchTextField" ); EditorGUILayout.EndVertical();
GUIStyle、GUISkin 的许多内置样式咱也不是很清楚全貌,只介绍了自己常用的几个,有额外需求的可以自行搜索看看。
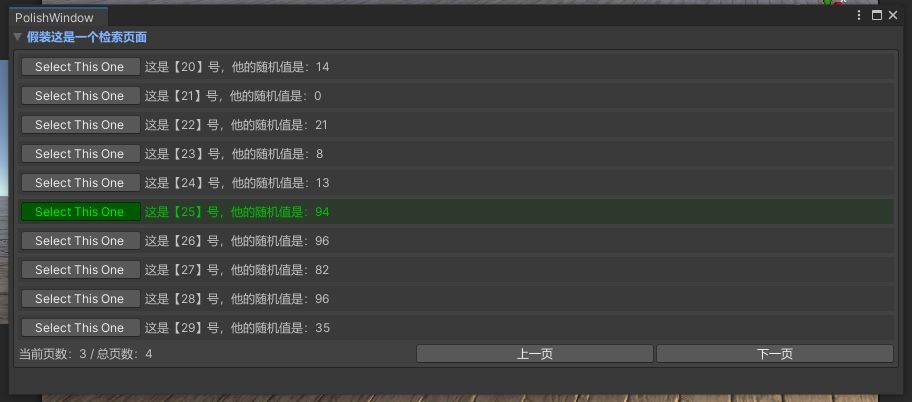
四、案例实战 好了,你已经学会 1+1=2 了,下面我们来算一个微积分吧。
样例:
示例代码:
1 2 3 4 5 6 7 8 9 10 11 12 13 14 15 16 17 18 19 20 21 22 23 24 25 26 27 28 29 30 31 32 33 34 35 36 37 38 39 40 41 42 43 44 45 46 47 48 49 50 51 52 53 54 55 56 57 58 59 60 61 62 63 64 65 66 67 68 69 70 71 72 73 74 75 76 77 78 79 80 81 82 83 84 85 86 87 using UnityEditor;using UnityEngine;public class PolishWindow : EditorWindow { public static PolishWindow m_mainWindow; private const int arrayLength = 35 ; private const int countPerPage = 10 ; private GUILayoutOption maxWidth = GUILayout.MaxWidth(120 ); private Vector2 scrollRoot; private int page = 1 ; private int currentSelectionIndex = -1 ; private int totalPage; private int [] someValues; private bool foldOut; [MenuItem("MyWindows/PolishWindow" ) ] public static void OpenWindow () { m_mainWindow = EditorWindow.GetWindow<PolishWindow>(); m_mainWindow.Show(); } private void OnEnable () { someValues = new int [arrayLength]; totalPage = (int )Mathf.Ceil((float )arrayLength / (float )countPerPage); for (int i = 0 ; i < someValues.Length; i++) { someValues[i] = Random.Range(0 , 100 ); } } private void OnGUI () { scrollRoot = EditorGUILayout.BeginScrollView(scrollRoot); foldOut = EditorGUILayout.BeginFoldoutHeaderGroup(foldOut, "假装这是一个检索页面" ); if (foldOut) { EditorGUILayout.BeginVertical("frameBox" ); for (int i = (page - 1 ) * countPerPage; i < someValues.Length; i++) { if (i >= page * countPerPage) break ; if (currentSelectionIndex == i) GUI.color = Color.green; else GUI.color = Color.white; EditorGUILayout.BeginHorizontal("box" ); if (GUILayout.Button("Select This One" , maxWidth)) { currentSelectionIndex = i; } EditorGUILayout.LabelField($"这是【{i} 】号,他的随机值是:{someValues[i]} " ); EditorGUILayout.EndHorizontal(); } EditorGUILayout.BeginHorizontal(); EditorGUILayout.LabelField($"当前页数:{page.ToString()} / 总页数:{totalPage} " ); if (GUILayout.Button("上一页" )) { page -= 1 ; page = Mathf.Clamp(page, 1 , totalPage); } if (GUILayout.Button("下一页" )) { page += 1 ; page = Mathf.Clamp(page, 1 , totalPage); } EditorGUILayout.EndHorizontal(); EditorGUILayout.EndVertical(); } EditorGUILayout.EndFoldoutHeaderGroup(); EditorGUILayout.EndScrollView(); } }
小结: 实际上,但我们足够熟悉 Editor 编辑器这一套时,我们完全可以遵循 OOP 思想,进行编辑器组件的封装继承。
比如定一个总的 EditorWindow 类,定义一个抽象基类,然后在总窗口使用反射进行类型检索,对所有继承于抽象基类的进行汇总,在面板上显示对应的按钮,点哪个就实例化哪个窗口进行显示。
这样在写一个新窗口时,只需要继承于抽象基类,定义基本的逻辑与绘制就可以了,总窗口会自动地把新窗口归纳整理到自己的菜单栏中。
当然,编辑器的奇技淫巧还有许多,全靠经验积累。
终于写完了,完结撒花呜呜呜。
8 OnValidate 需要验证一些数据 我们都知道,搭建创建的编辑器扩展脚本,基本上都是给关卡设计或者策划人员用的。在编译游戏的时候对他们输入的一些数值进行校验,是一个好的习惯。他们不需要关心一些数值的限制,但是作为开发人员的我们是需要的。
如何使用 OnValidate? Validate 字面意思是生效
在官方文档上仅有一个简短的说明,并且没有示例代码。
**编辑器模式下 OnValidate 仅在下面两种情况下被调用:
脚本被加载时
Inspector 中的任何值被修改时
下面是脚本中如何使用它:
1 2 3 4 5 6 7 8 9 10 using UnityEngine;using System.Collections;public class OnValidateExample : MonoBehaviour { public int size; void OnValidate () Debug.Log("OnValidate" ); } }
上面的脚本挂在 gameobject 上,效果如下
Examples 下面是一些体现 OnValidate 函数强大功能的使用场景
角度简化 使用场景 - 我们需要将设计人员输入的角度限定在 - 359 到 359 之间,因为 360 相当于 0 度。
1 2 3 4 5 6 7 8 9 10 11 using UnityEngine;using System.Collections; public class OnValidateExample : MonoBehaviour { public float objectRotation; void OnValidate () objectRotation = objectRotation % 360 ; } }
效果如下:
二次方 使用场景 - 当需要设计人员输入 16 到 4096 之间 2 的整数次幂时
1 2 3 4 5 6 7 8 9 10 11 12 using UnityEngine;using System.Collections; public class OnValidateExample : MonoBehaviour { [RangeAttribute(16, 4096) ] public int textureSize; void OnValidate () textureSize = Mathf.ClosestPowerOfTwo(textureSize); } }
效果如下
关联值 使用场景 - 需要 “Nitro” 车的速度比其他车的速度大至少 20mph.
1 2 3 4 5 6 7 8 9 10 11 12 13 14 15 16 17 using UnityEngine;using System.Collections; public class OnValidateExample : MonoBehaviour { [RangeAttribute(10, 300) ] [Tooltip("mph" )] public int maxCarSpeed; [RangeAttribute(10, 300) ] [Tooltip("mph" )] public int maxNitroSpeed; const int minNitroSpeedExtra = 20 ; void OnValidate () if (maxNitroSpeed < maxCarSpeed + minNitroSpeedExtra) maxNitroSpeed = maxCarSpeed + minNitroSpeedExtra; } }
效果如下


 微信
微信 支付宝
支付宝